Scenario
We're looking to add more fields to a form dynamically via an event like an onclick. For instance, adding
user-defined items to a shopping cart or even adding individual file upload fields that are coupled with
user-defined descriptions. I'm an MVC novice and it was painfully frustrating to find any good source
material for guidance or any guidance at all. With some extraordinarily imaginative Googling I found a few
articles that either needed some Ajax or others using Editor Templates, the former I felt I just wasn't
ready for and the latter didn't work for me.
This is my story.
Overview
In this article, I will attempt to walk you through the process of creating MVC form controls dynamically, in this instance with an onclick event, as well as posting them back to the controller for processing. For this, we will be using JavaScript, only for the onclick event, and the rest will be in C#.
Creating the Project
For this project, I used Visual Studio 2017. The process should be the same for earlier versions. Open VS then go to File > New > Project...:
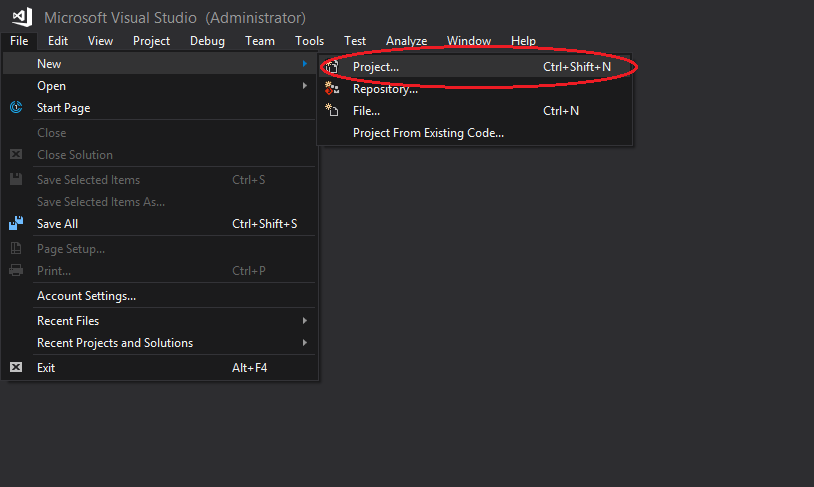
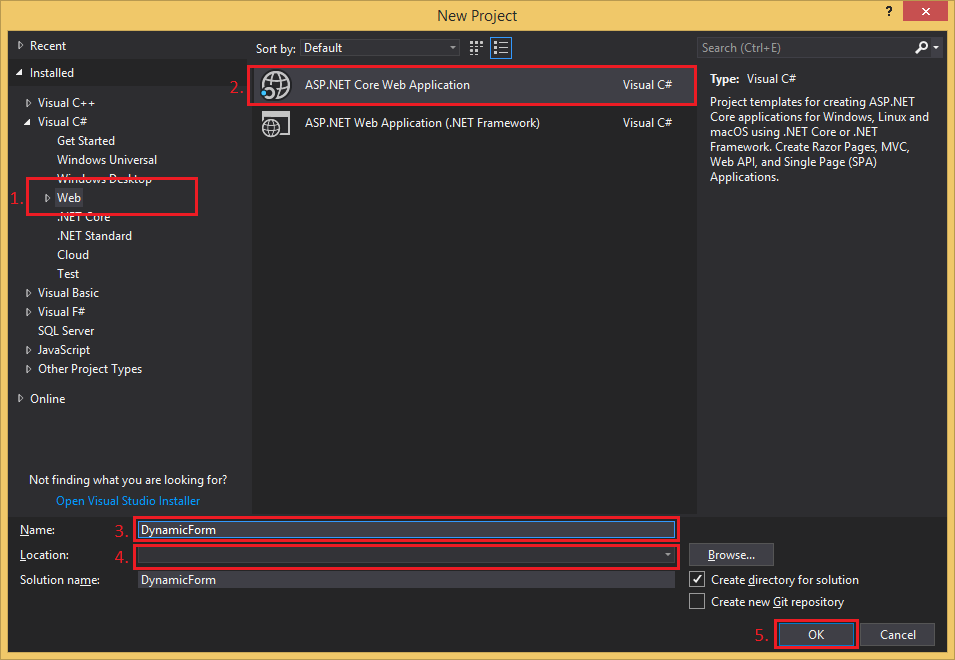
and a "New Project" window should pop up. In the New Project window:
- Select the language, preferably Visual C#, then click on "Web".
- Then select ASP.NET Core Web Application.
- Name your application.
- Select your project's destination.
- Finally, click "OK" to confirm.
Next, a "New ASP.NET Core Web Application - [Application Name Here]" window will pop up. I will be using the .NET Core framework and version 2.1 for this example. Now we will choose the type of web application:
- Click on "Empty".
- And then on "OK" to complete the application creation process.
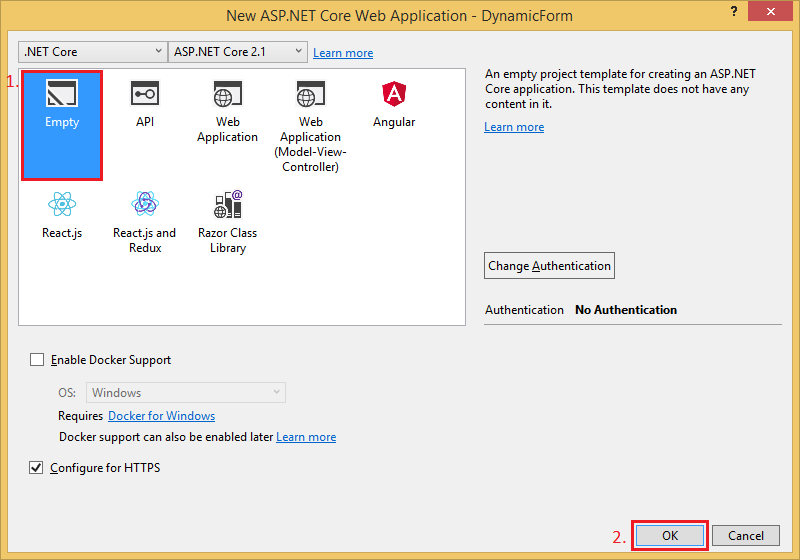
We chose an empty project because we didn't need all the scaffolding that came with the MVC (Model-View-Controller) template but because the project is empty we will create most things from scratch.
Creating Files and Folder Structure
This section will be about the creation of the basic MVC skeleton folder structure. We'll also create files that will be later needed like the model, View and controller as well as the layout, View Import and View Start.
Folder Structure
First the folder structure:
- In the right pane or, more specifically, the "Solution Explorer" right-click on the projects name.
- Click on "Add".
- Then Click on "New Folder".
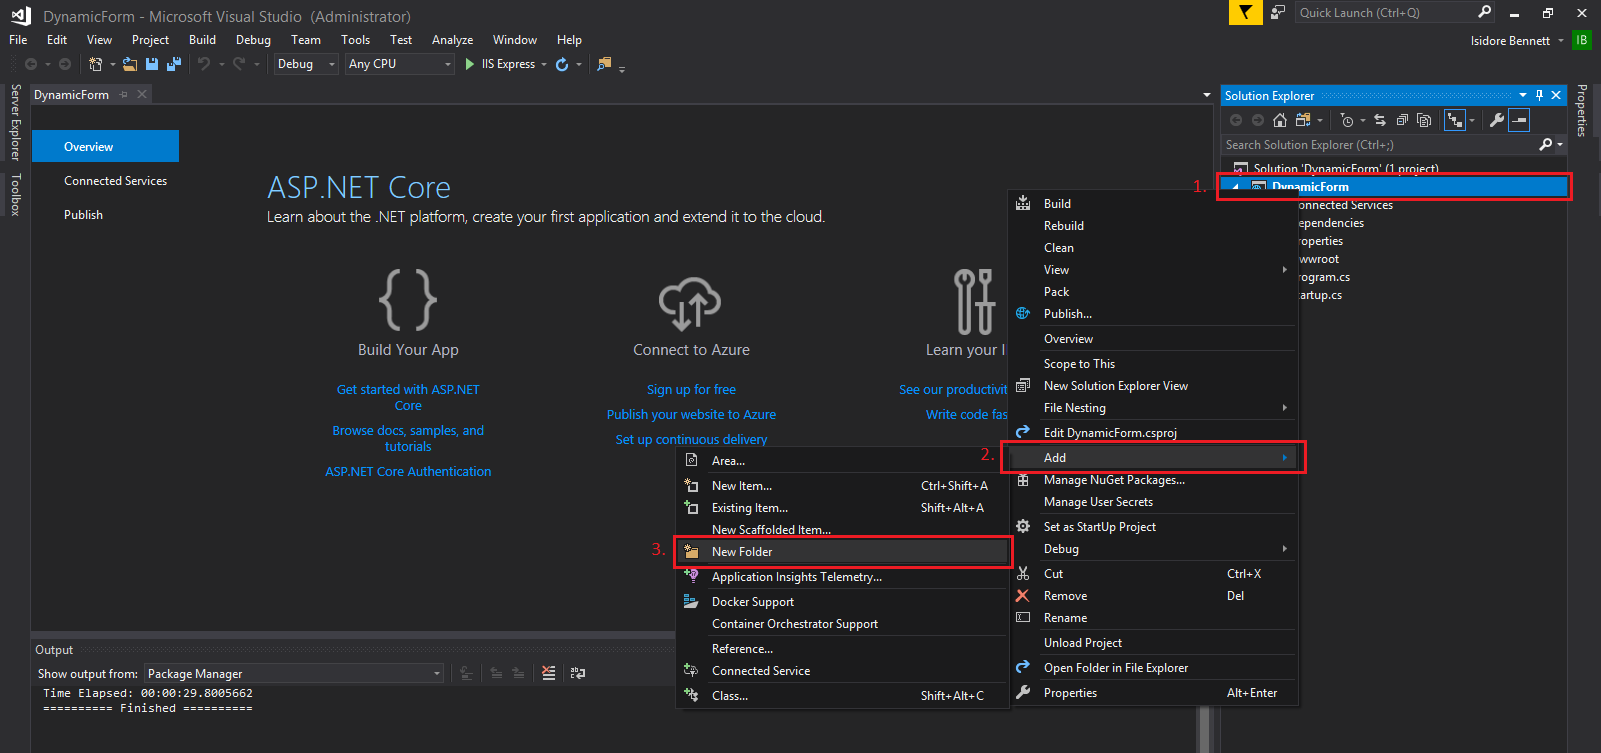
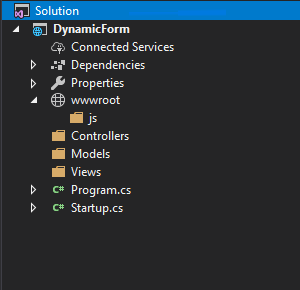
Call this folder "Models" and then repeat this process another 2 times and call the new folders "Views" and "Controllers". Also, create a folder called "js" in the "wwwroot". Your project file structure should look something like this:
File Creation
Now we will create the files that we will be using for this example; the model, the view and the controller:
Controller
- right-click on the Controller folder.
- Click on "Add".
- Then on "Controller...".
An "Add Scaffold" window should appear, select the "MVC Controller - Empty" scaffold and then click on "Add".
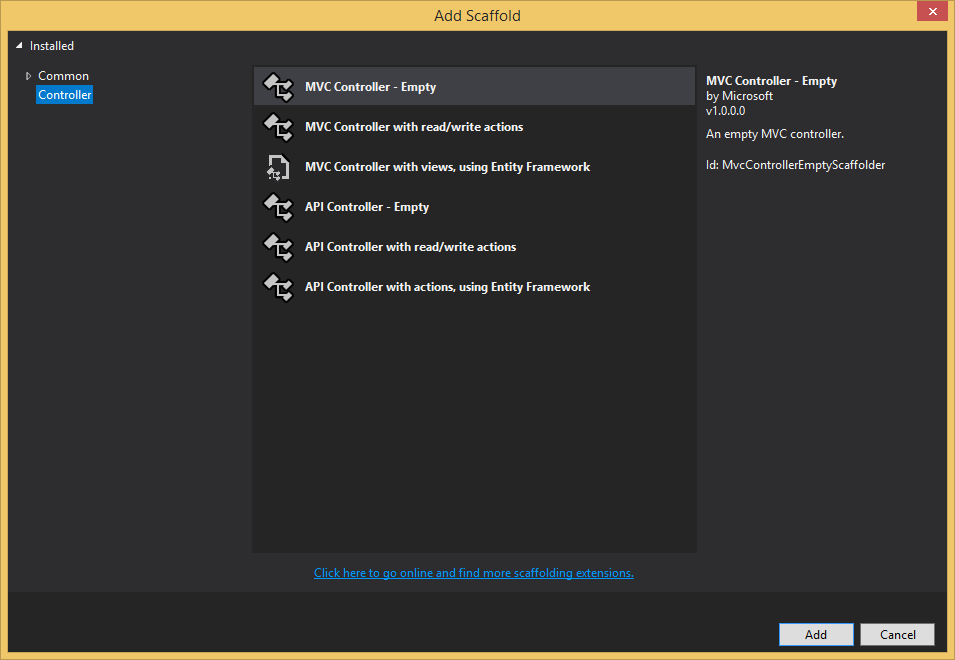
Another window should pop up called "Add Empty MVC Controller" where you can name the controller. We will name ours "PersonController" for the sake of this example.

Be sure to keep the "Controller" suffix at the end of the name and then click add to start
the scaffolding process.
Your newly created controller should have opened automatically but if not, open it and change the name of the
public IActionResult Index() method to
public IActionResult PersonForm().
We do this for routing reasons, I'll speak more on this later on.
View
Create another folder in the Views folder and call it "Person".
Luckily Visual Studio is smart enough to guess the context of the folders we right-click on so the process
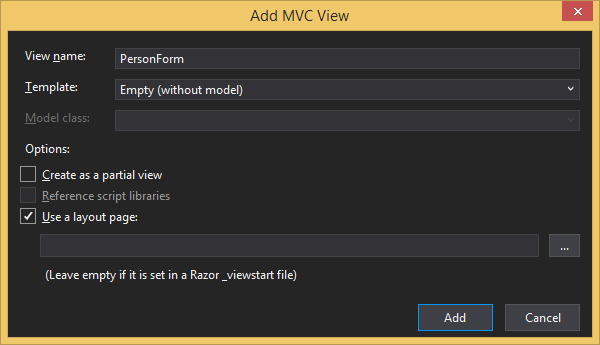
will be similar for the "Views" folder but this time we'll select "View...". We can call this view
"PersonForm" and leave everything else as is and continue to click "Add".
Model
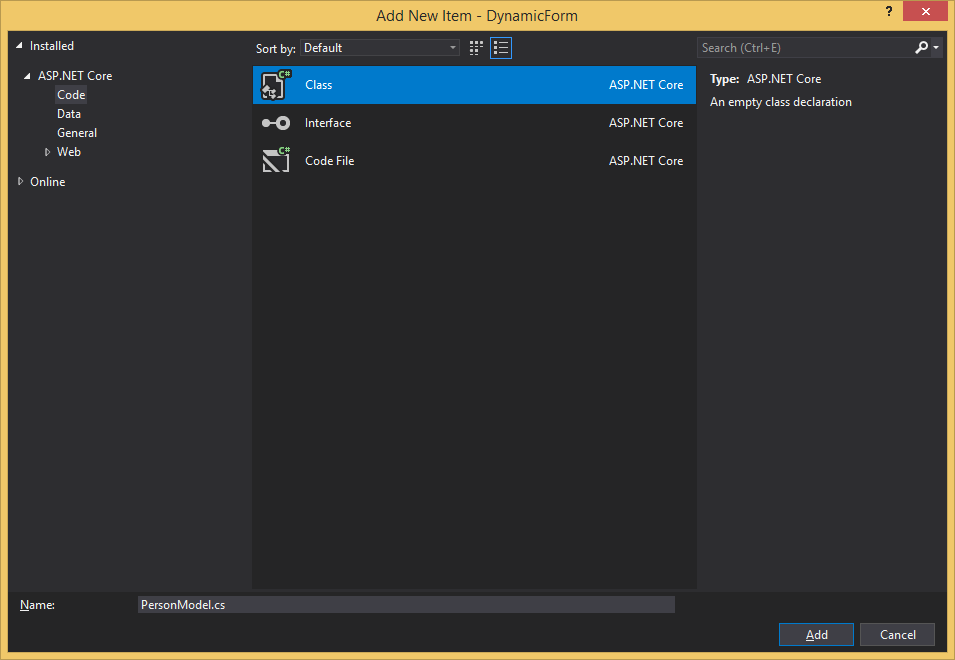
Creating a model is easier than the other two and only requires that you create a class. This time we will select "Class..." or we can use the built-in shortcut for VS 2017 by pressing Shift+Alt+C. We will name this class "PersonModel" and we will press "Add" once again.
We've created our model, view, and controller. We just need to add a few items and folders and then we'll begin with the logic.
_Layout
Create a new folder in the Views folder called "Shared", in this folder add a new item but instead of selecting the other options we've selected before, we will select "New Item..." or use the shortcut Ctrl+Shift+A. An "Add New Item [Application Name Here]" window will appear, then:
- Click on "Web".
- Choose Razor Layout.
- And then click on "Add".
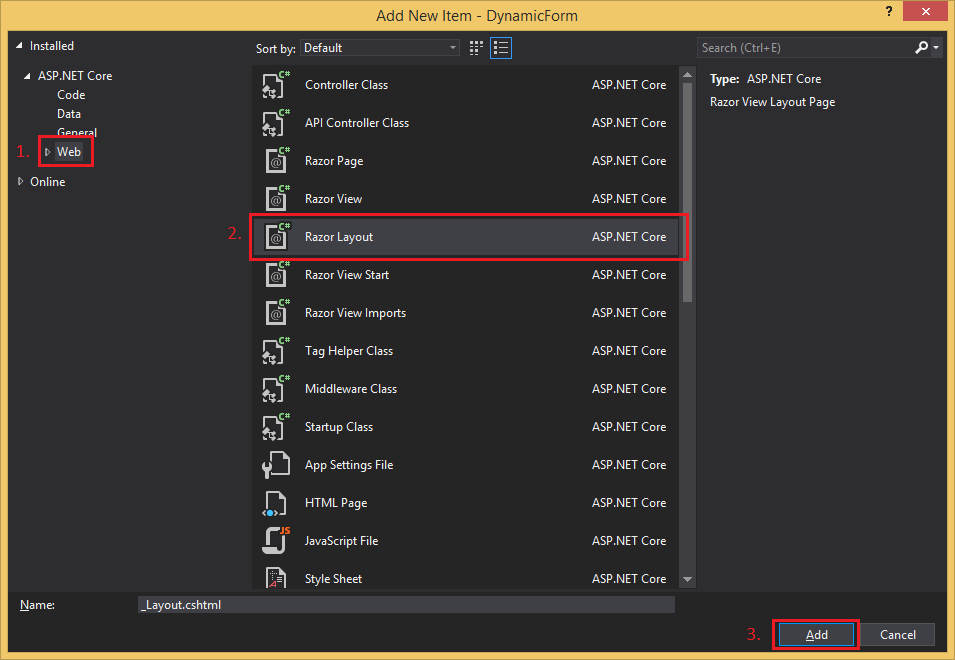
It's advised that the new files name be left as "_Layout.cshtml".
_ViewImports
Next, we will need to create a "_ViewImports.cshtml" file in the Views folder, this will allow us to use things
like TagHelpers that will prove to be beneficial later on.
You can do this by repeating the above step but instead of "Razor Layout" select "Razor View Imports".
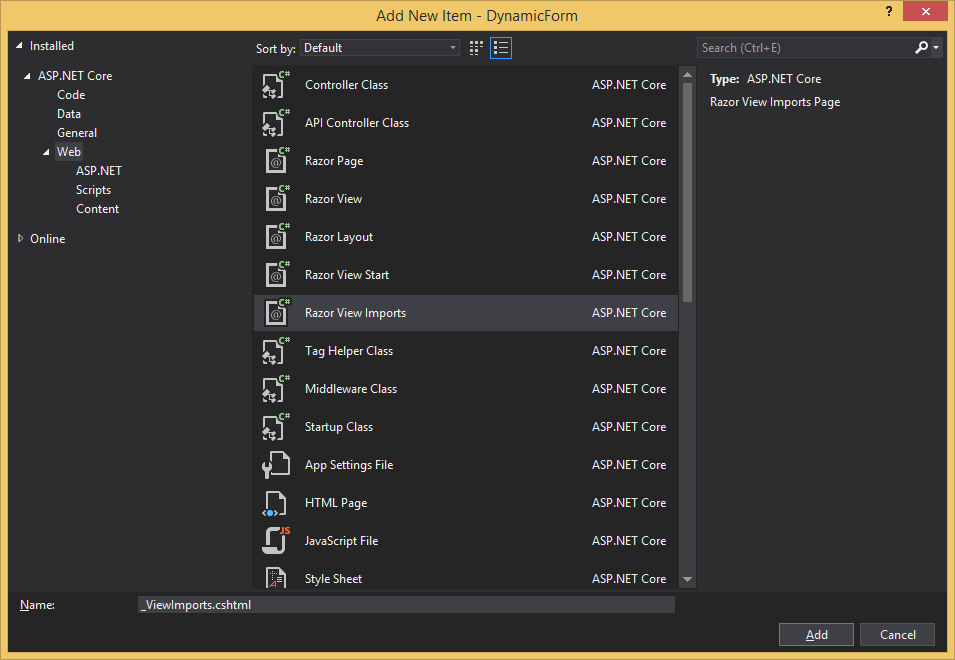
It's also advised that the new files name be left as "_ViewImports.cshtml".
And while we're at it, add this line of code to the newly created "_ViewImports.cshtml" file:
@addTagHelper "*, Microsoft.AspNetCore.Mvc.TagHelpers.
JavaScript
In the js folder that we had created earlier add a JavaScript file much like we did with the Razor Layout. We can leave the js file name as is or you can change it, it's up to us.
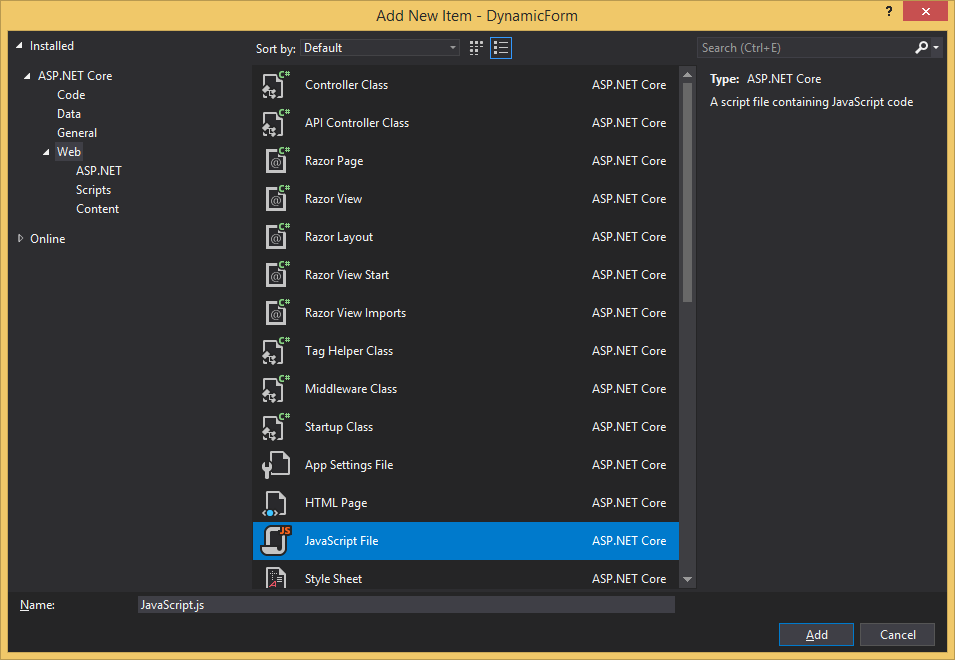
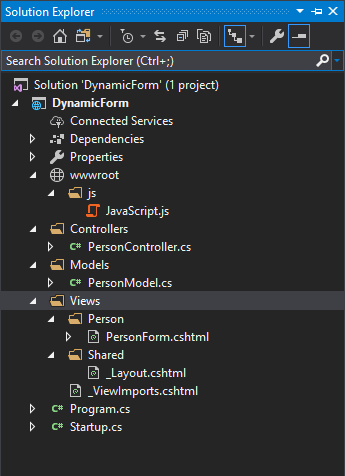
Our project setup is now complete. And your folder structure should look as follows:
Logic
First, we'll set up the routing for the app. We're doing this so that the app will automatically take us to
our form. Because this is an MVC app we use routing patterns, these patterns are processed by the routing
engine to determine which classes and methods need to be called and what parameters are to be passed to these
methods if need be. Spelling is crucial when it comes to routing. So what
happens is that the engine uses the filing structure to find needed files but also looks at our Controller
names as well as our Action (or method) names. If we don't name these things correctly the engine wouldn't
be unable to return the needed resources.
Then we will also allow the app to access and use static files like .js, .css, etc.
Startup.cs
In your "Startup.cs" file add this block of code in the
"
public void Configure(IApplicationBuilder app, IHostingEnvironment env)
"
method:
- app.UseStaticFiles();
- app.UseMvc(routes =>
- {
- routes.MapRoute(
- name: "default",
- template: "{controller=Person}/{action=PersonForm}/{id?}");
- });
If you run your application you might get the following runtime error:
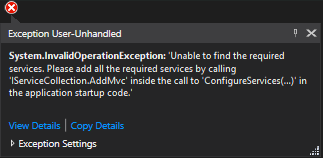
This is because we haven't added the MVC service yet. In the
public void ConfigureServices(IServiceCollection services)
method add the following code:
services.AddMvc();
Run your application now and your browser should display "Hello World!" which is nice if we were creating a Hello World app but we're not, so quickly stop the application and delete this block of code in the same method we added the routing to:
- app.Run(async (context) =>
- {
- await context.Response.WriteAsync("Hello World!");
- });
Run the app now and if you followed correctly or haven't change the PersonForm.cshtml, you should see this:
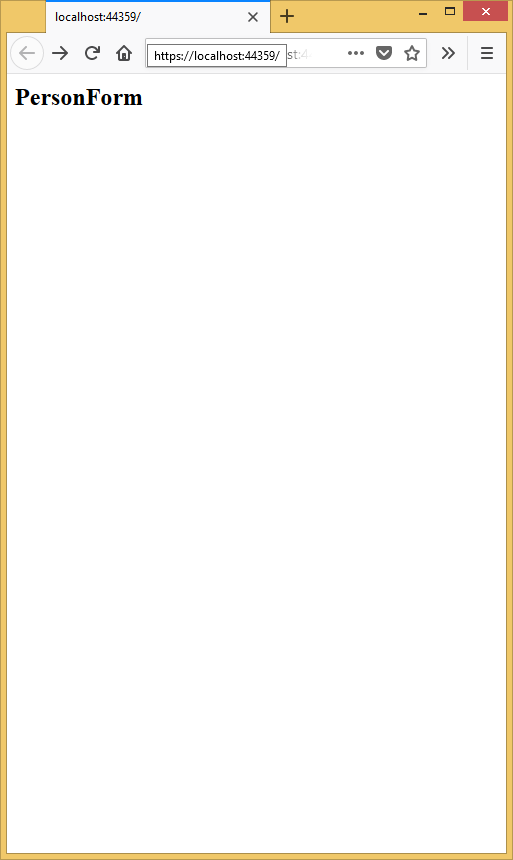
Noice.
PersonModel.cs
Now we're going to create our Person Model. Open the PersonModel and add these lines of code to the PersonModel class:
- public string Name { get; set; }
- public string Surname { get; set; }
- public List <PersonModel> People { get; set; }
We're creating a list of our PersonModel because we'll be returning a list of people back to our controller when we submit our form.
PersonForm.cshtml
Next we'll create our form in our PersonForm.cshtml, it will be a basic form but it will demostrate what we're trying to achieve. But before we do that we need to specify which model we'll be using (PersonModel) as well as which layout we'll be using so right at the top of your cshtml add these lines of code:
- @model DynamicForm.Models.PersonModel
- @{
- Layout = "~/Views/Shared/_Layout.cshtml";
- }
And then at the bottom of your cshtml file add the following code:
- <button>Another One</button>
- @using (Html.BeginForm("PersonForm", "Person", FormMethod.Post))
- {
- <button type="submit">Submit People</button>
- <br />
- <br />
- <label asp-for="People[0].Name">Name</label>
- <input asp-for="People[0].Name" type="text" class="name" />
- <br />
- <label asp-for="People[0].Surname">Surname</label>
- <input asp-for="People[0].Surname" type="text" class"surname" />
- <br />
- }
Okay right, People[0].Name is something I struggled weeks to figure out. It might seem obvious
to initialize your form with the first index of the list of objects you want to return but the tricky part
now is creating more form controls on the fly. Naturally, I thought, "Just copy your Razor code and inject into
the DOM and increment a few variables here and there with some JS." Haha! No. The secret is in how Razor
interprets and renders People[0].Name.
If we run our app now we should see a boring Name and Surname form:
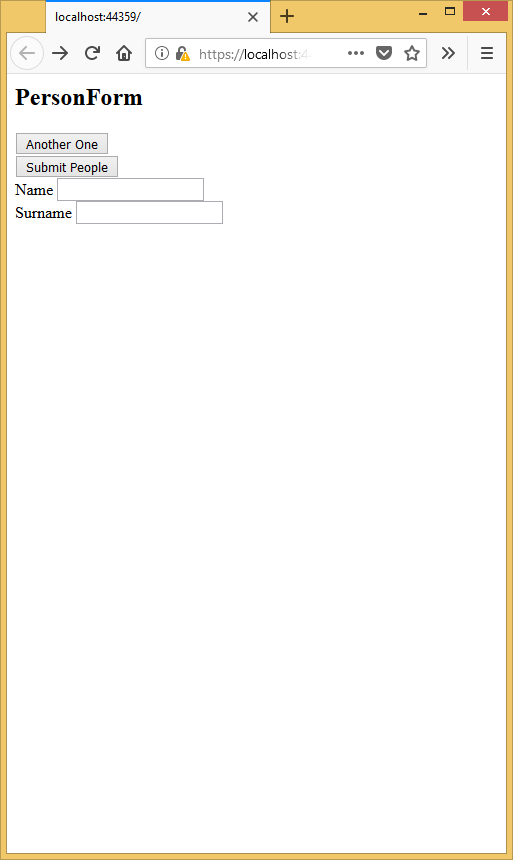
We're going to inspect our form controls now to better understand how Razor creates them. To do this, while our app is running, in the browser press the F12 key or right-click in the window and inspect element. Expand the "form" element and you should see this:
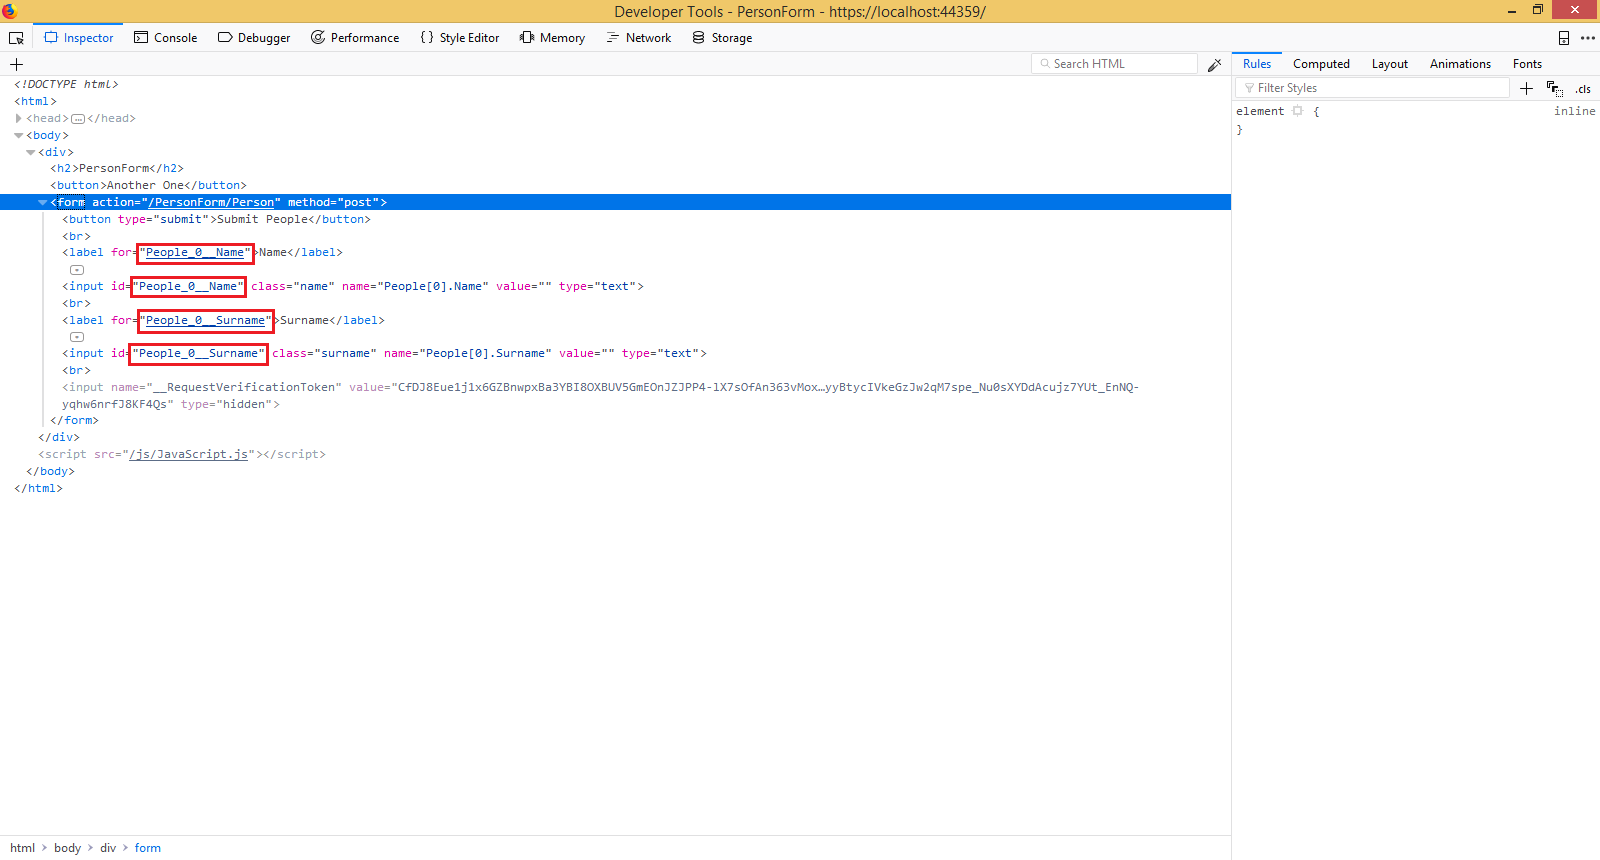
The points of interest are the things I highlighted. This is very important to note because spelling could be the difference between you posting data from your form to your controller or not. Notice how the id attribute has been populated without us even defining it? Razor did the things. It looks like Razor replaces special characters with underscores as well.
Shweet. Now we can move onto including our JS and coding the logic.
JavaScript.js
First we'll include or rather call our JS. Open The _Layout.cshtml file and add
<script src="~/js/JavaScript.js" ></script>
just above the closing body tag (</body>). This will now call our
JavaScript code. Your code should resemble the following:
- <!DOCTYPE html>
- <html lang='en'>
- <head>
- <meta name="viewport" content="width=device-width" />
- <title>@ViewBag.Title</title>
- </head>
- <body>
- <div>
- @RenderBody()
- </div>
- <script src="~/js/JavaScript.js"></script>
- </body>
- </html>
Now we will open the Javascript.js file and do what you all came here for, the dynamic form logic. It's a lot but
I'll walk you through it. Your JavaScript.js file should be empty so just throw this code in there:
-
document.getElementsByTagName("button")[0].addEventListener("click", function () {
-
var elements = document.getElementsByClassName("name")
-
var count = elements.length
-
-
var newNameLabel = document.createElement("label")
-
var newSurnameLabel = document.createElement("label")
-
-
var newNameInput = document.createElement("input")
-
var newSurnameInput = document.createElement("input")
-
-
newNameLabel.setAttribute("for", "People_" + count + "__Name")
-
newSurnameLabel.setAttribute("for", "People_" + count + "__Surname")
-
-
newNameLabel.innerHTML = "Name"
-
newSurnameLabel.innerHTML = "Surname"
-
-
newNameInput.setAttribute("id", "People_" + count + "__Name")
-
newSurnameInput.setAttribute("id", "People_" + count + "__Surname")
-
-
newNameInput.setAttribute("class", "name")
-
newSurnameInput.setAttribute("class", "surname")
-
-
newNameInput.setAttribute("name", "People[" + count + "].Name")
-
newSurnameInput.setAttribute("name", "People[" + count + "].Surname")
-
-
newNameInput.setAttribute("type", "text")
-
newSurnameInput.setAttribute("type", "text")
-
-
document.getElementsByTagName("form")[0].append(newNameLabel)
-
document.getElementsByTagName("form")[0].append(newNameInput)
-
document.getElementsByTagName("form")[0].append(document.createElement("br"))
-
document.getElementsByTagName("form")[0].append(newSurnameLabel)
-
document.getElementsByTagName("form")[0].append(newSurnameInput)
-
document.getElementsByTagName("form")[0].append(document.createElement("br"))
-
})
-
In the first line, we're adding an event listener to our "Another One" button. When the user clicks on this it
will execute the code we define in its function. Because we didn't add any identifying attributes like classes or
ids to our buttons, we will use
getElementsByTagName("button")[0]to get the appropriate button. We know the button we're looking for is the first one and becausegetElementsByTagName("button")returns an array of buttons, we get the first by appending[0]togetElementsByTagName("button"). - Line 2 is where we get all the "name" text inputs by class name. This also returns an array. Using "surname" as the class name would've worked all the same.
- Line 3 is where we get the number of, you could say "people", by getting the length of elements.
- Lines 5 through 9 are for the creation of our controls.
- Lines 11 through 27 (excluding 14 - 15) is where we actually try to mimic the initial form that Razor compiles for us. Here we set our attributes and for our; "for", "name", "id", "class" and "type"(although I feel like the "type" attribute is overkill). We're trying to make the controls resemble the initial controls as closely possible so that our controller will accept them.
-
Lines 29 through 34 are where we append our form controls to the form. Even if there's only one form on the
page, we're still using
getElementsByTagNamebecause, much like our buttons, our form doesn't have identifying attributes. So this also returns an array and we still need to use the index of 0 ([0]).
PersonController.cs
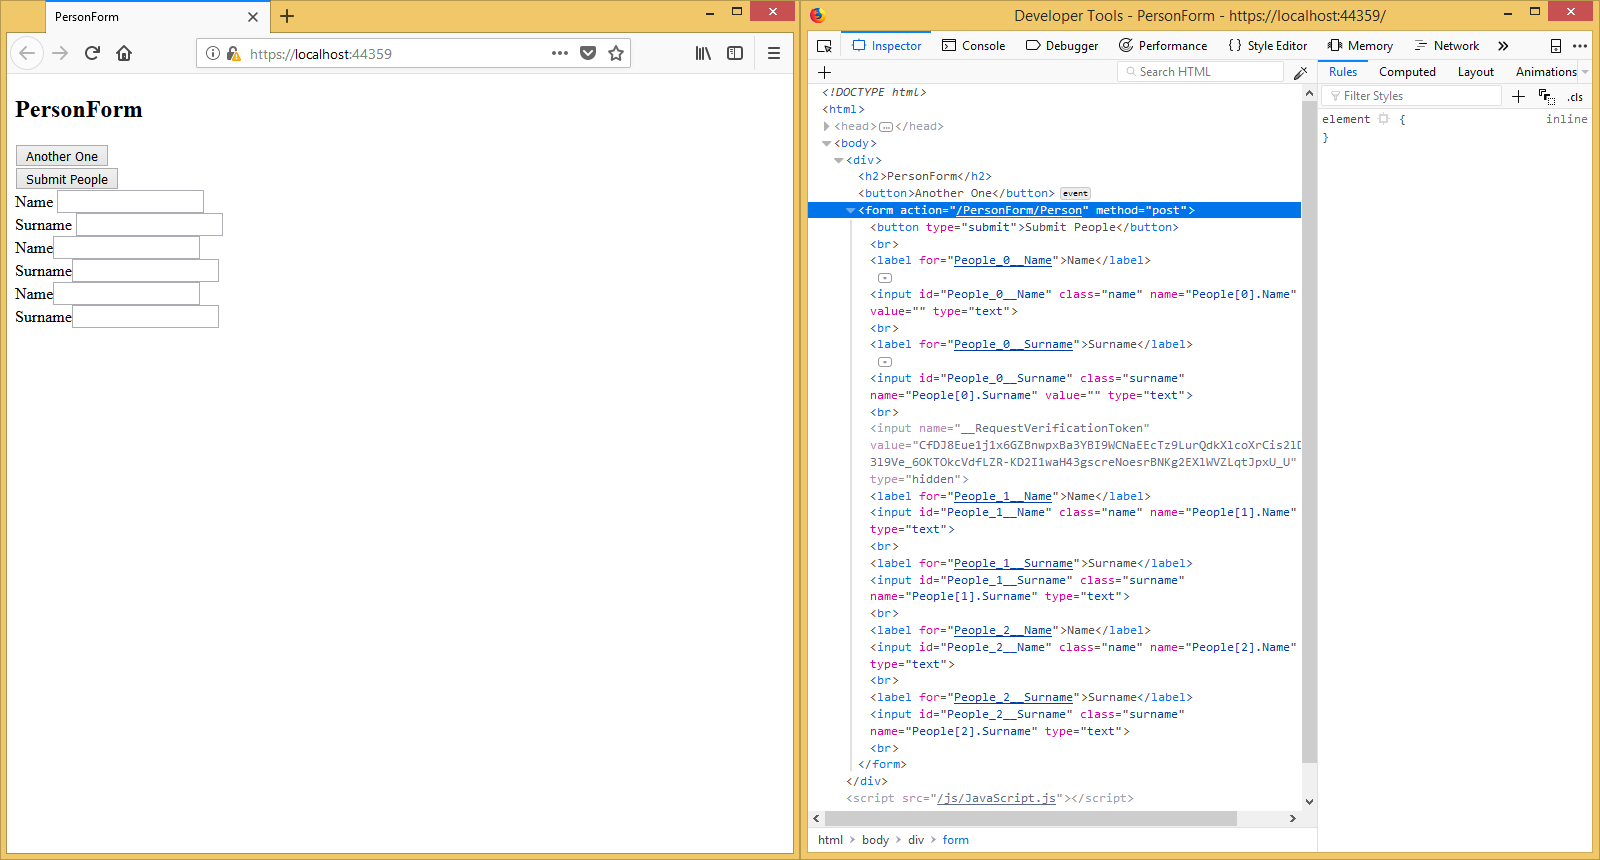
We can run our code now and test our new functionality. Try clicking on "Another One", new controls should populate our form one person at a time. And if we inspect our elements now we see that our new control closely resemble our initial Razor controls:
We're really close to the end now. We've finished our model, view, and JS. We just need to do some final
touch-ups to our controller and we're done.
Stop the app then open the PersonController. You should only have the following method:
- public IActionResult PersonForm()
- {
- return View();
- }
Now our controller is automatically Getting but we'll make that more implicit with some method decorations. Add
[HttpGet] on top of the public IActionResult PersonForm() method.
Next, we will be dealing with the Posting method. Add this block of code underneath the aforementioned method:
- [HttpPost]
- public IActionResult PersonForm(PersonModel personModel)
- {
- return View();
- }
Notice how this method is similar but takes a parameter of PersonModel and is an [HttpPost] method.
This is because we're posting our form and our controller will be receiving our person collection after it has
been submitted.
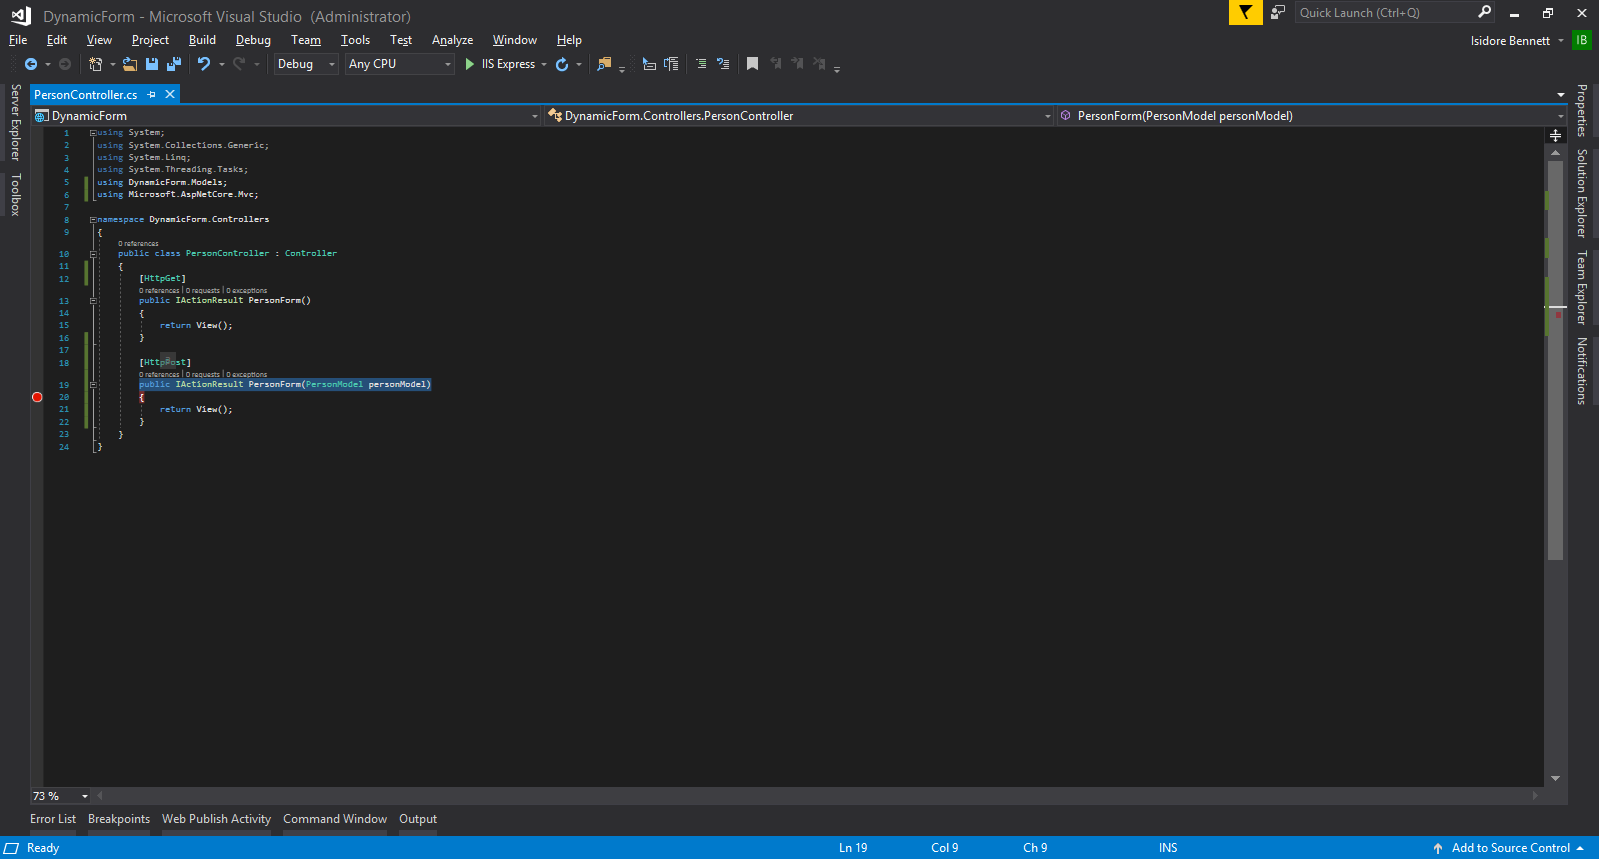
Before we run our app for the last time, put a breakpoint on the
public IActionResult PersonForm(PersonModel personModel)
method:
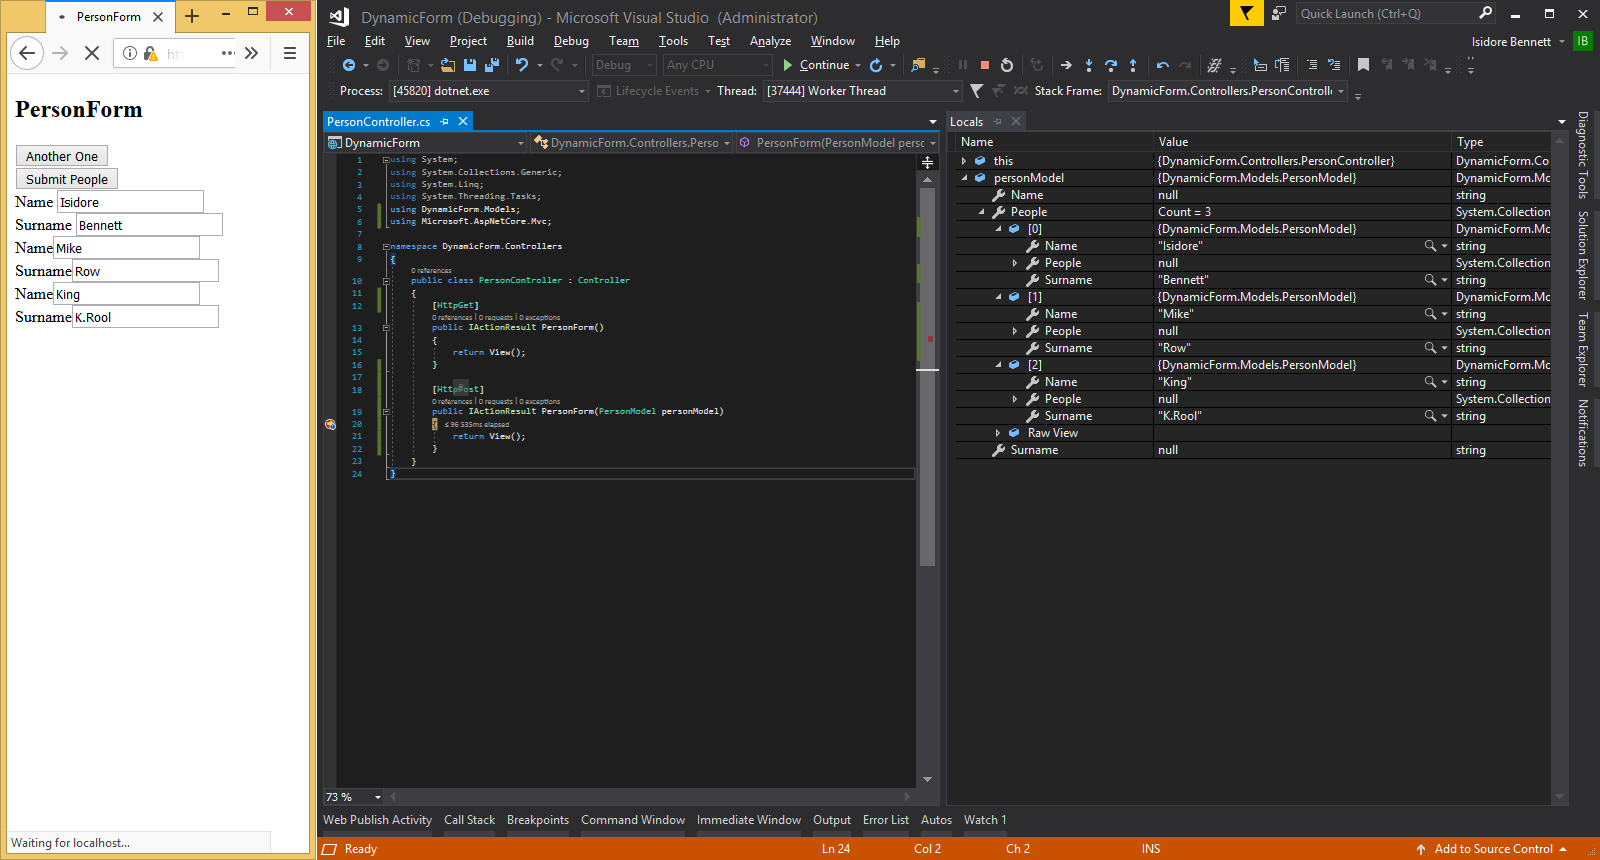
Let's run the app one last time. Click on "Another One" as many times as you like, fill in the fields then submit
the form. The program should hit the breakpoint. At this point, we'll be able to see what information we've
received from the form. You can either view this by hovering over personModel and drill down in the
model or view the data in the "Locals" window. Below you will see that I have added two additional people and
submitted the form:
There should be better ways of doing this as I've mentioned in my opening statements but if those methods also never worked for you, I hope this one will. Hopefully, you found this article useful.
That's all folks. :/