Scenario
Sometimes more is better and sometimes having multiple forms in a single View could be involve less work and it could
streamline the user experience as well. For instance having a form for a login and a form for registration in the same View
could be better than switching between two different Views and sitting through load times.
This is my story.
Overview
In this article I will guide you through the process of creating an ASP.NET MVC application that will be able to handle two forms in a single View. You're free to use more than two of course but we'll use two so you can get the basic idea. We'll be using Razor for our front-end and C# for our back-end.
Creating the Project
For this project, I used Visual Studio 2017. The process should be the same for earlier versions. Open VS then go to File > New > Project...:
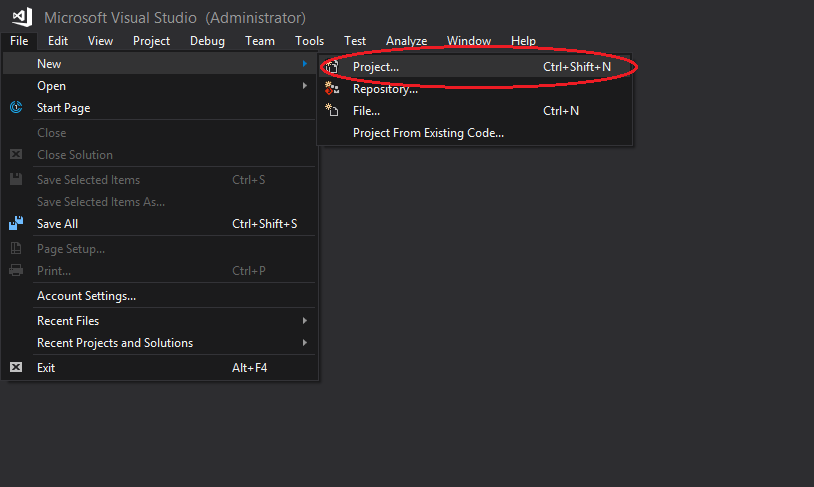
and a "New Project" window should pop up. In the New Project window:
- Select the language, preferably Visual C#, then click on "Web".
- Then select ASP.NET Core Web Application.
- Name your application.
- Select your project's destination.
- Finally, click "OK" to confirm.
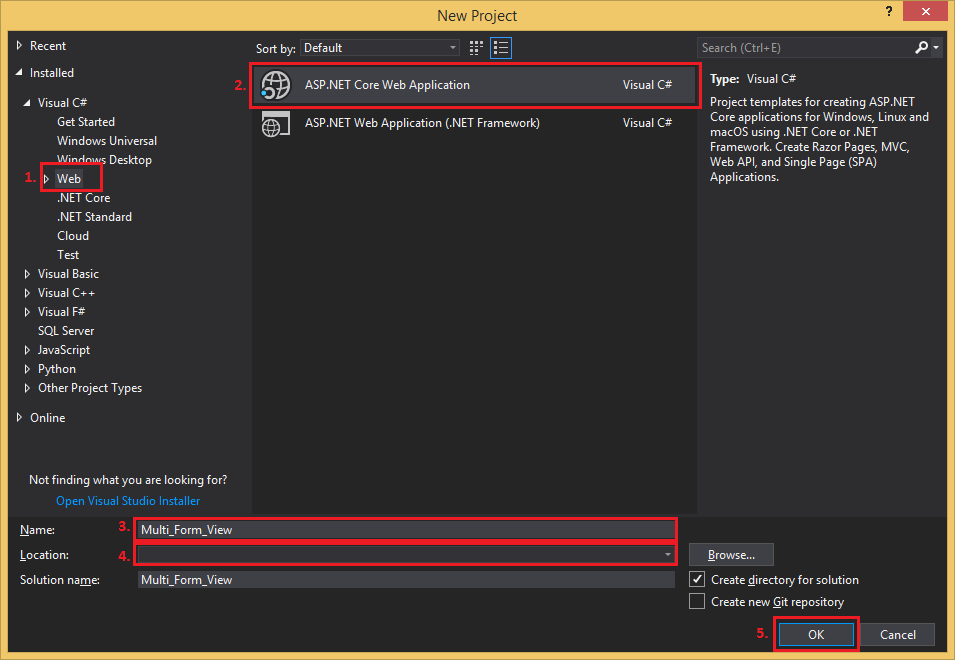
Next, a "New ASP.NET Core Web Application - [Application Name Here]" window will pop up. I will be using the .NET Core framework and version 2.1 for this example. Now we will choose the type of web application:
- Click on "Empty".
- And then on "OK" to complete the application creation process.
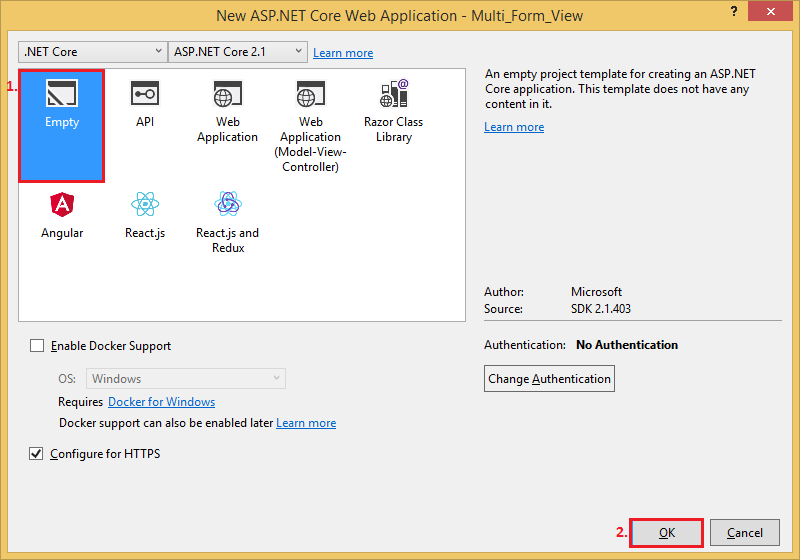
We chose an empty project because we didn't need all the scaffolding that came with the MVC (Model-View-Controller) template but because the project is empty we will create most things from scratch.
Project Setup
In this section, we'll set up our project. Here we'll be configuring our web application so that we can use things like static files (important), MVC (importanter) and routing (not as important but always nice to have).
Open up your "Startup.cs" file and remove the following lines of code:
- app.Run(async (context) =>
- {
- context.Response.WriteAsync("Hello World!");
- });
Before we removed these lines of code, we could've ran our project and the browser would've displayed "Hello World!". So we remove this because we don't really want to see that string of text when we start running and debugging our project.
Next, we'll be doing some config.
Firstly we're going to include the MVC service. Add services.AddMvc(); to the
public void ConfigureServices(IServiceCollection services) method. Your method should look
something like this:
- public void ConfigureServices(IServiceCollection services)
- {
- services.AddMvc();
- }
Finally, we will set up the routing. Add the following lines of code to the
public void Configure(IApplicationBuilder app, IHostingEnvironment env) method:
- app.UseMvc(routes =>
- {
- routes.MapRoute(
- name: "default",
- template: "{controller=From}/{action=Index}/{id?}");
- });
Your method should look like this if you haven't removed the the condition that checks whether the project is in Development or not:
- public void Configure(IApplicationBuilder app, IHostingEnvironment env)
- if (env.IsDevelopment())
- {
- app.UseDeveloperExceptionPage();
- }
-
- app.UseMvc(routes =>
- {
- routes.MapRoute(
- name: "default",
- template: "{controller=Form}/{action=Index}/{id?}");
- });
- }
Creating Files and Folder Structure
This section will be about the creation of the basic MVC skeleton folder structure. We'll also create files that will be later needed like the model, View and controller as well as the layout, View Import and View Start.
Folder Structure
First the folder structure:
- Right-click on the project name (Multi_Form_View in this case).
- Click/hover on "Add".
- Then click on "New Folder" (name the new folder "Models").
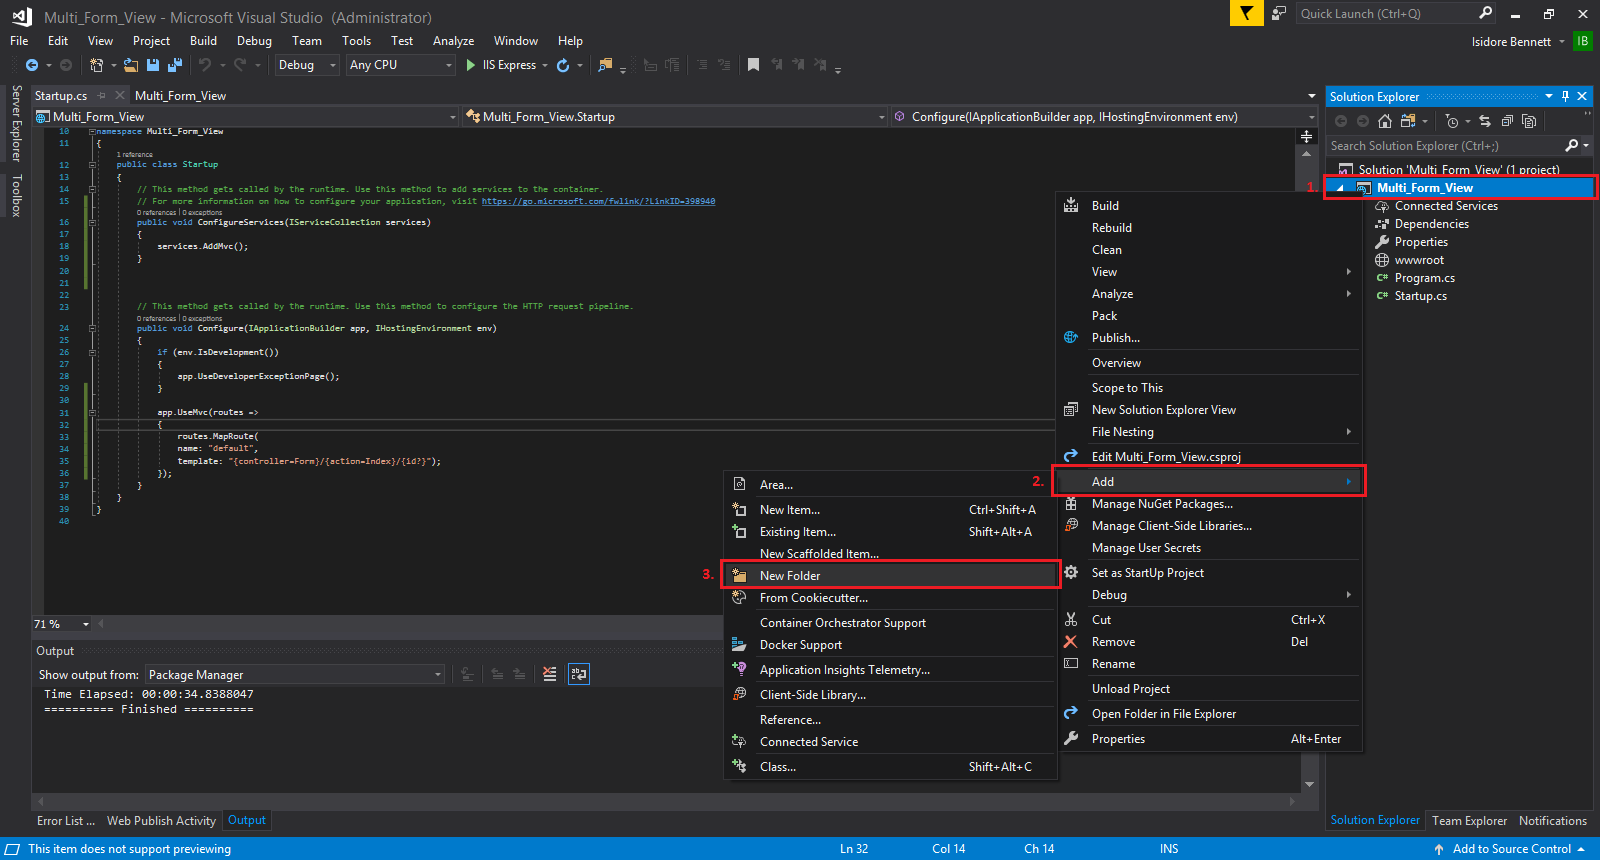
Repeat the above steps 2 more times, name these folders "Views" and "Controllers" respectively.
And again, do this 2 more times in the "Views" folder and call the new folders "Form" and
"Shared" respectively.
If done correctly, your folder structure should look something like this:
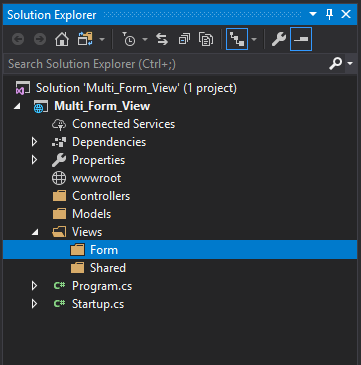
File Creation
Now we'll be adding our files. First, the easier one to find, the Model which is basically a class.
Model
- Right-click on the "Models" folder.
- Click/hover on "Add".
- Click on "Class...".
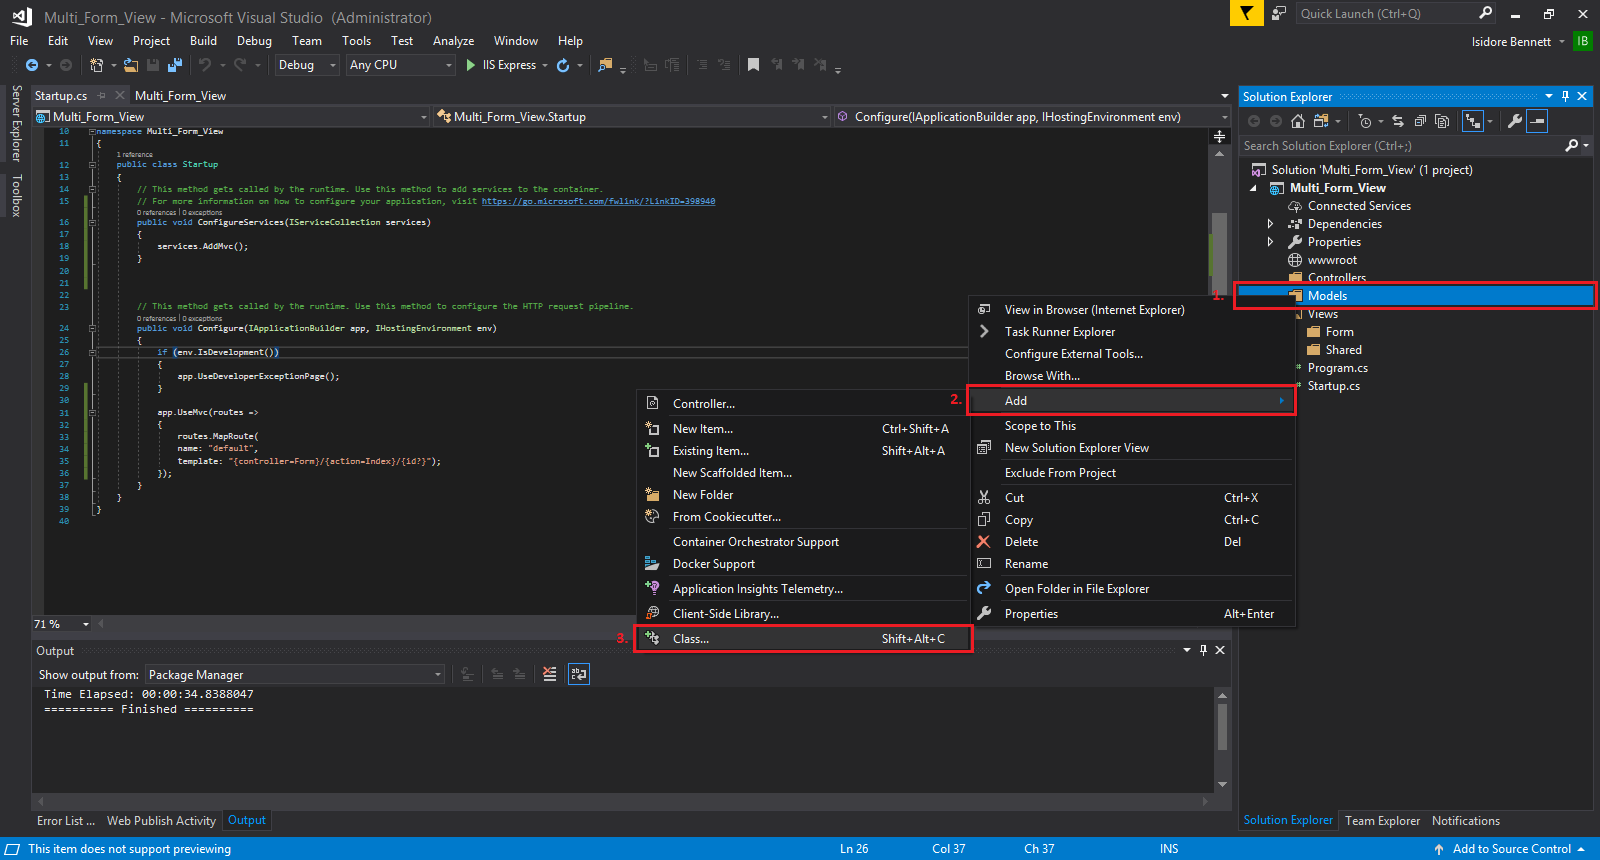
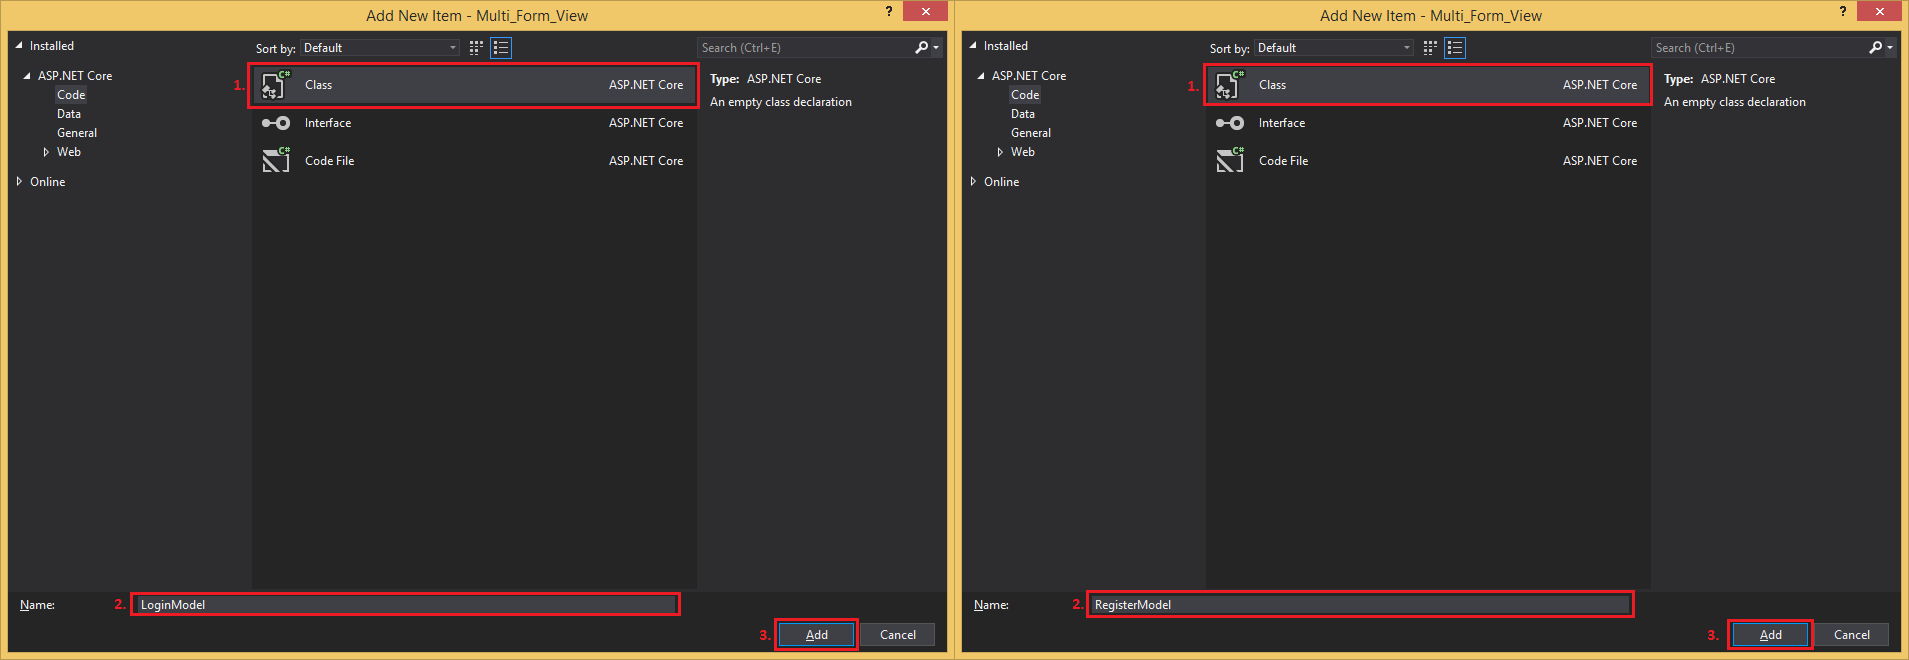
Then you should be greeted with a popup window:
- Click on "Class" if it wasn't already selected.
- Name your class so that it would easily describe your Model. We'll be making a Login Model. We'll call this Model LoginModel.
- Click "Add".
Repeat the above steps for the Register Model and call it RegisterModel.
Controller
The Controller next:
- Right-click on the "Controllers" folder.
- Click/hover on "Add".
- Click on "Controller...".
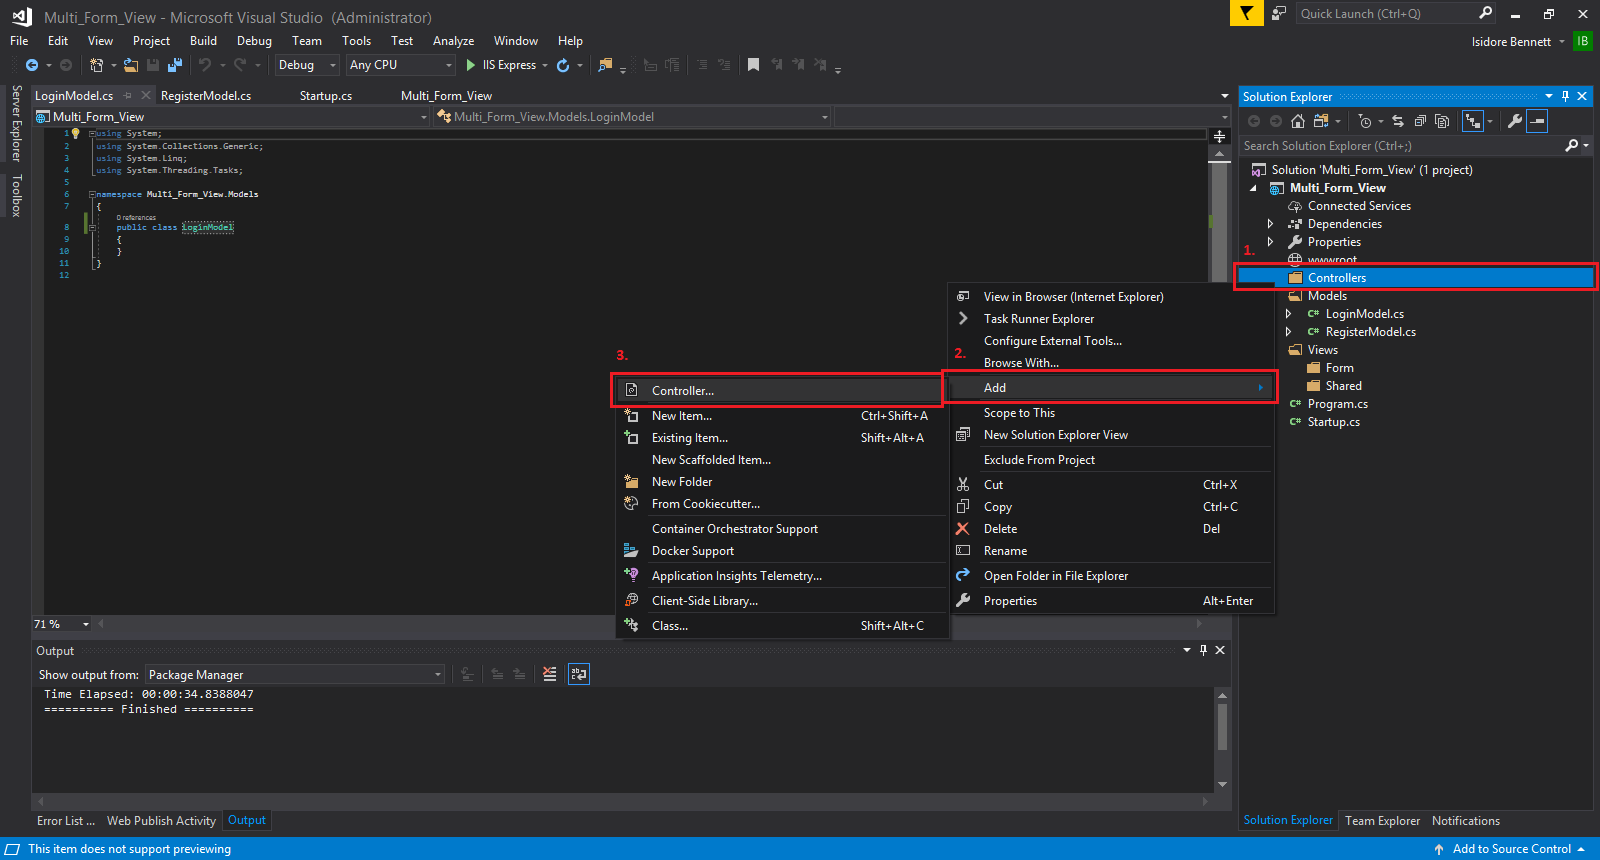
You'll see an "Add Scaffold" window pop up:
- Click on "MVC Controller - Empty"
- and then on "Add".
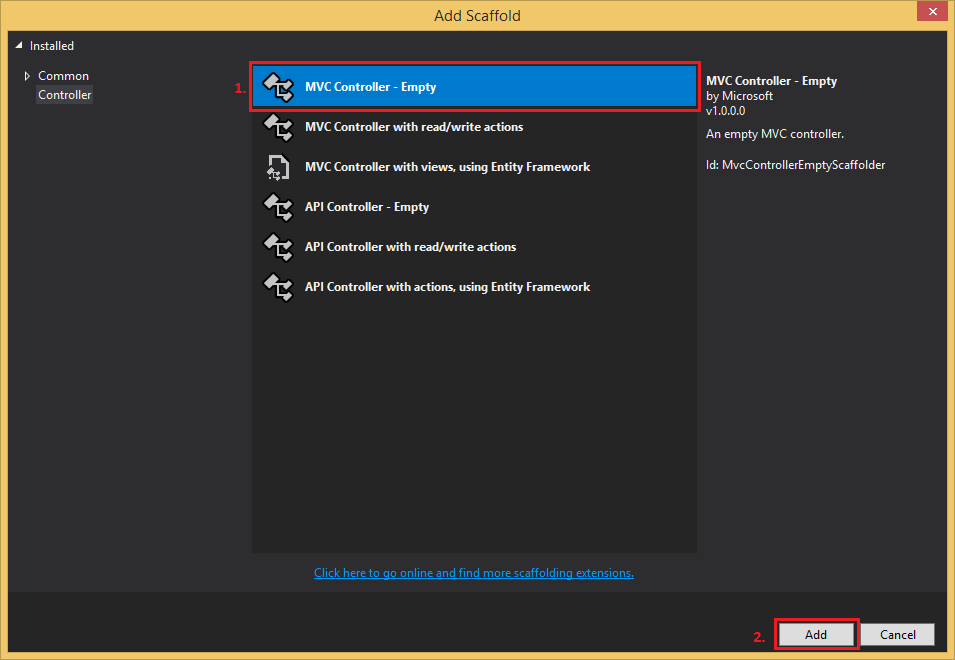
And now you'll see another window that will prompt you to name your controller:
- Name it "FormController"
- then click on "Add".

View
Now we'll add the final part to the MVC trinity, the View (I know I know, I got the order wrong):
- Right-click on the "Form" folder that's located in the "Views" folder.
- Click/hover on "Add".
- Click on "View...".
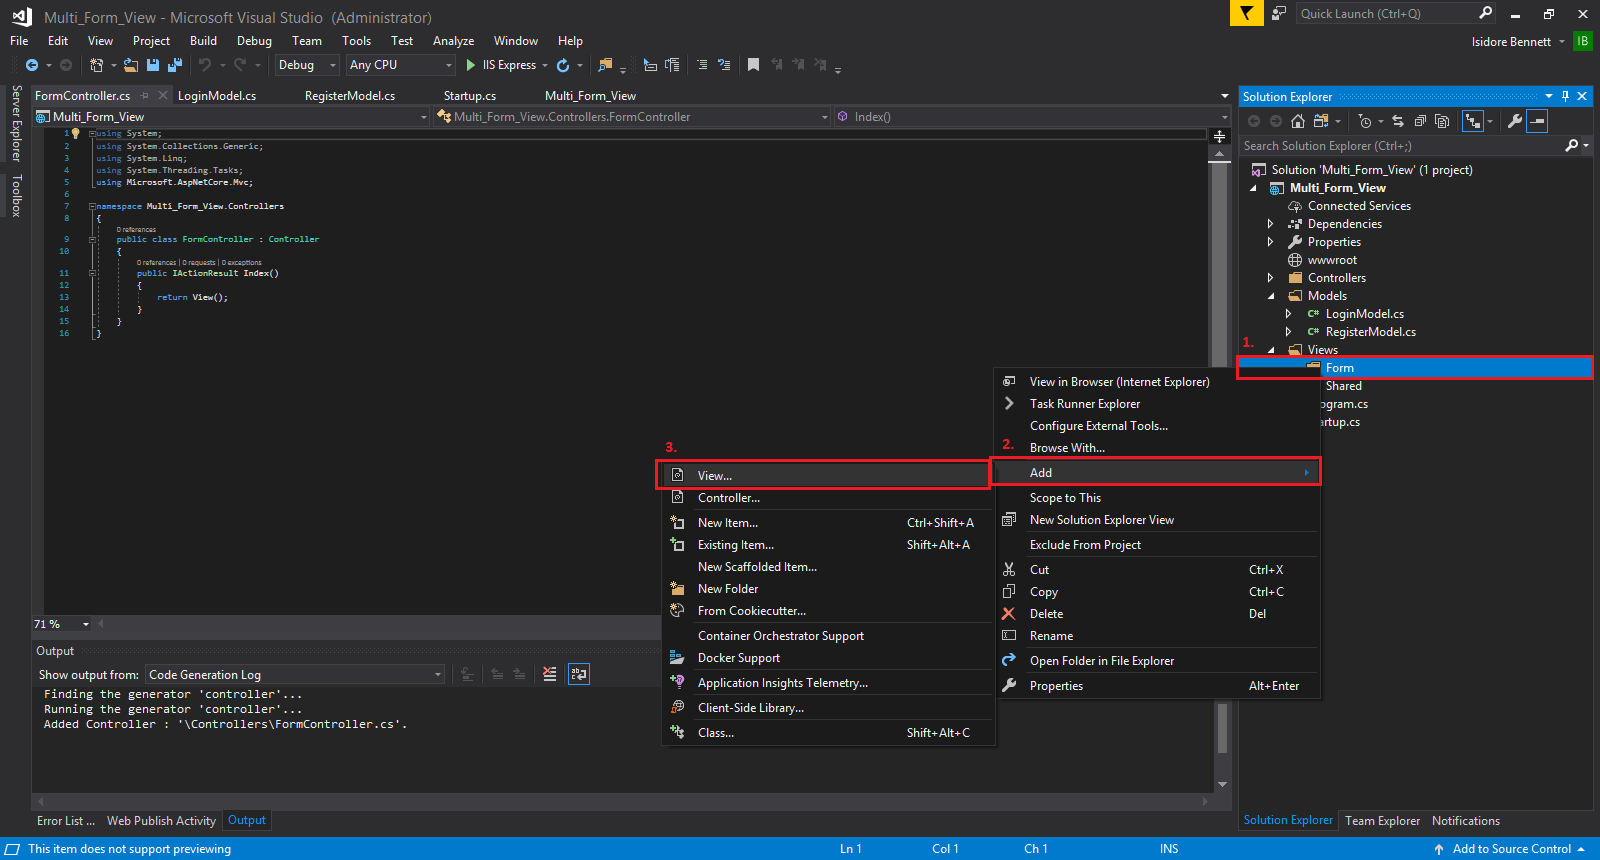
An "Add MVC View" window should pop up:
- Name the View "Index"
- then conclude the View creation by clicking on "Add".
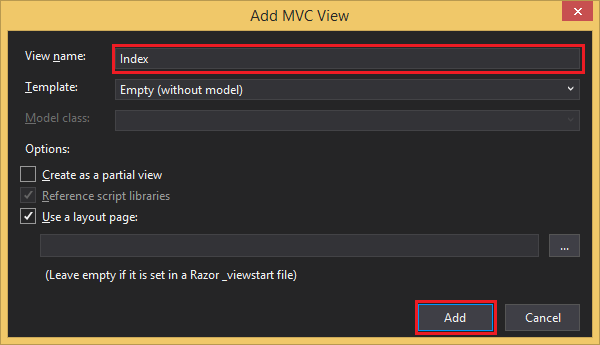
Although this concludes the creation of the MVC files (being the Model, the View and, the
Controller), we still have a few more items to add.
Also, notice how we have an error in our newly created View. We will include the file that will
rectify that in the next step.
_ViewImports
The _ViewImports file will allow us to use things like tag helpers and allow us to import our Models with using statements, among other things, but for now, we're just going to use it for tag helpers. This will also remove the error we saw earlier in our View:
- Right-click on the "Views" folder.
- Click/hover on "Add".
- Click on "New Item...".
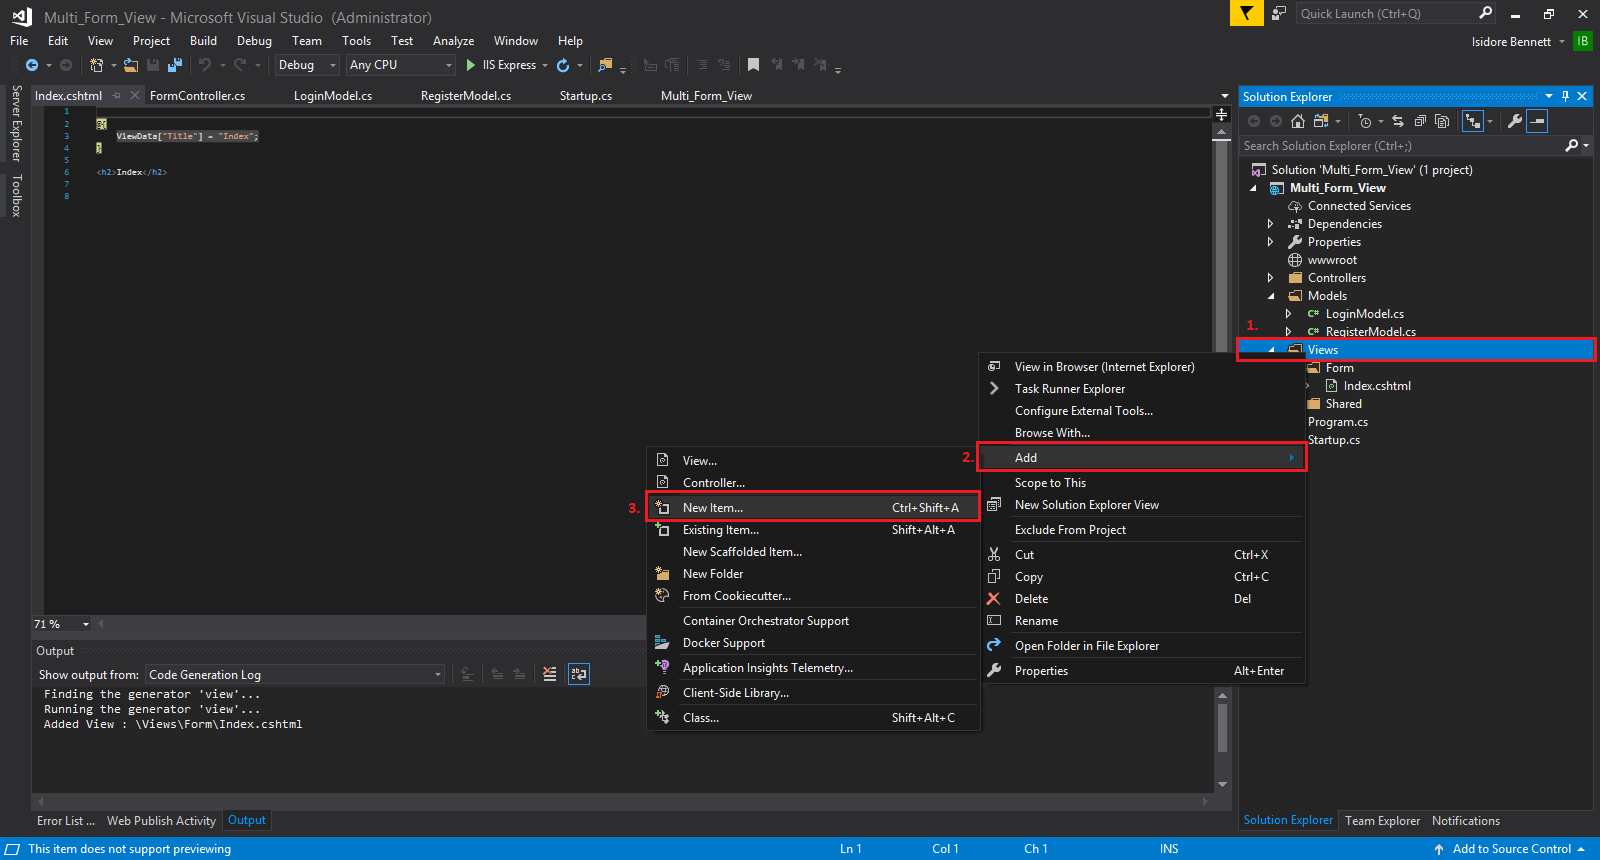
When the "And New Item" window pops up:
- Click on Web in the left pane.
- Look for and click on "Razor View Imports".
- Click on "Add".
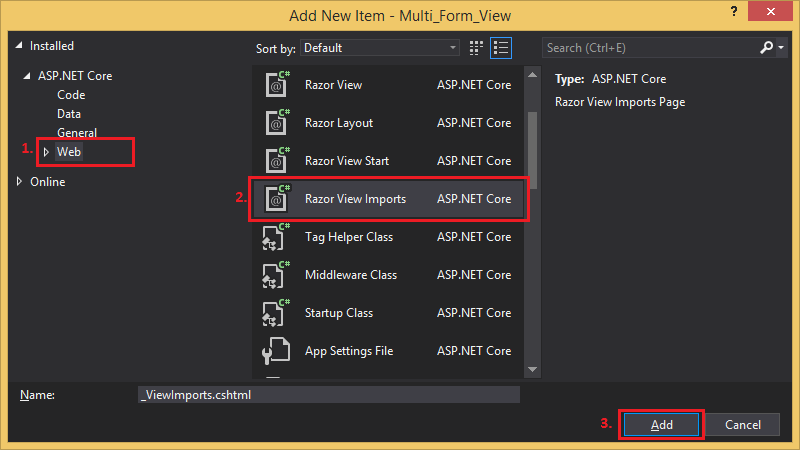
There's no need to rename the file so we'll leave it as is. Your _ViewImports.cshtml should be
open but if it's not, open it and add this line of code
@addTagHelper "*, Microsoft.AspNetCore.Mvc.TagHelpers" and save. If you open up the
View now the error should be gone but if not, just close then open it.
_ViewStart
This is more of a "nice to have" item compared to the others we've created thus far. It will allow us to specify a default layout to be used by our View. If we don't create the "_ViewStart" file we'd have to explicitly specify which Layout we'd want use which is okay for now because we only have one View but if we had more Views we'd have to do this for every View.
To create the "_ViewStart" file, follow the "_ViewImports" creation process but instead of
selecting "Razor View Imports", select "Razor View Start". And just like before, leave the name as
is.
Notice how the newly created "_ViewStart" has this line @{ Layout = "_Layout"; }
already? This line of code is calling a "_Layout" layout as a default for our Views. We'll create
this file next.
_Layuot
The "_Layout" kinda acts like a template, it helps with DRY principles which is nice.
To create the "_Layout" file, follow the previous two creation processes but instead this time add the file to the "Shared" folder and instead of selecting "Razor View Imports" or "Razor View Start", select "Razor Layout". And just like before, leave the name as is.
Before we move on to our logic, make sure that your project's file structure resembles this one:
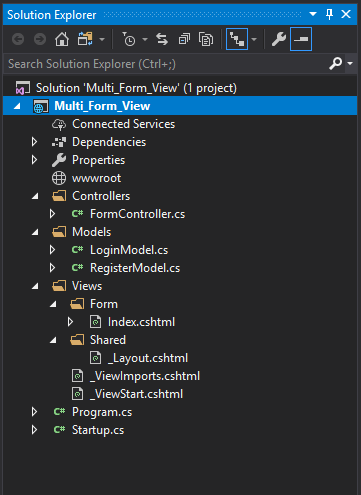
Logic
Now for coding the logic. We'll be setting up our Models, our View and our Controller.
Model
Open your "LoginModel.cs" and add the following lines of code to the public class LoginModel
class:
- public string UserName { get; set; }
- public string Password { get; set; }
Next open your "RegisterModel.cs" and add the following lines of code to the public class RegisterModel
class:
- public string FirstName { get; set; }
- public string LastName { get; set; }
- public string EmailAddress { get; set; }
- public string Password { get; set; }
View
We're gonna create our two forms in our View. Our Login form will take in our UserName and
our Password values from the user. Our Register form will take in our FirstName,
LastName, Password and our EmailAddress which would act as our
UserName in our Login form, we however won't be focusing on validation so we'll just be looking
at how to post our data for our respective forms to their respective Actions. Our forms should basically mimic
our Models so if you added more properties above and wish to assign values to them, you should add form fields
for each property.
Add these lines of code to your "Index.cshtml":
- @using (Html.BeginForm("Login", "Form", FormMethod.Post))
- {
- <label asp-for="UserName">User Name</label>
- <br />
- <input asp-for="UserName" type="text" name="UserName" />
- <br />
- <label asp-for="Password">Password</label>
- <br />
- <input asp-for="Password" type="text" name="Password" />
- <br />
- <button type="submit">Login</button>
- }
- @using (Html.BeginForm("Register", "Form", FormMethod.Post))
- {
- <label asp-for="FirstName">First Name</label>
- <br />
- <input asp-for="FirstName" type="text" name="FirstName" />
- <br />
- <label asp-for="LastName">Last Name</label>
- <br />
- <input asp-for="LastName" type="text" name="LastName" />
- <br />
- <label asp-for="EmailAddress">Email Address</label>
- <br />
- <input asp-for="EmailAddress" type="text" name="EmailAddress" />
- <br />
- <label asp-for="Password">Password</label>
- <br />
- <input asp-for="Password" type="password" name="Password" />
- <br />
- <button type="submit">Register</button>
- }
At lines 1 and 14 is where the magic happens. Here we're specifying to which Action and Controller the form contents should be sent to, "Login" and "Form" for our Login and "Register" and "Form" respectively.
Controller
In the controller we will process our data returned by our View upon submission. We will be doing some very basic
email formating as well as sending the email, duh.
In your "EmailController.cs" add the following code:
- [HttpGet]
- public IActionResult Index()
- {
- return View();
- }
- [HttpPost]
- public IActionResult Login(LoginModel loginModel)
- {
- return View();
- }
- [HttpPost]
- public IActionResult Register(RegisterModel registerModel)
- {
- return View();
- }
-
In line 1 we want to request the Index page so we decorate our Index method with an
[HttpGet]method. This requests our form contents and displays it as opposed to an[HttpPost]method that would rather send data which we used later on in lines 7 and 13. More on HTTP methods at w3schools.com. - Lines 8 and 14 we parameterize our methods with our LoginModel and RegisterModel respectively. Our Models are populated by our forms depending on the form we choose to submit.
Testing
Let's run our app and see what results we come up with:
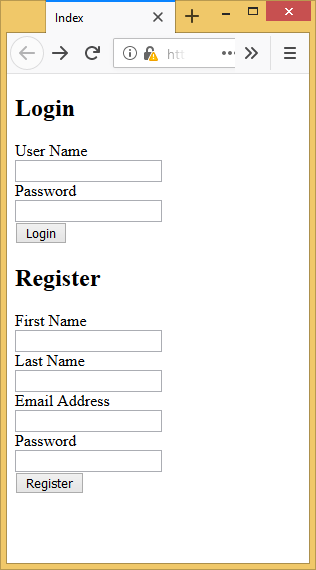
To inspect that data that's being send to our Controller from a specific form, we will want to add Breakpoints like this:
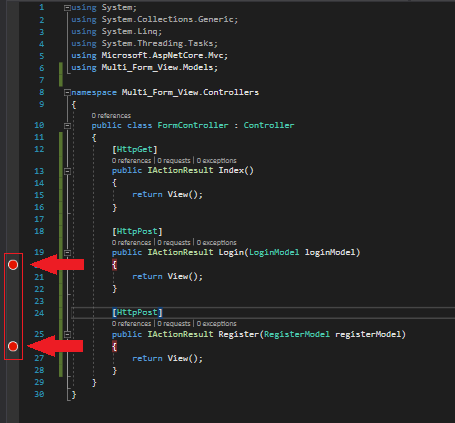
by clicking in the furthest left column.
Now we can add data to any specific form and submit, I'll start by filling in the Register form and then inspecting the data that was posted to our Controller:
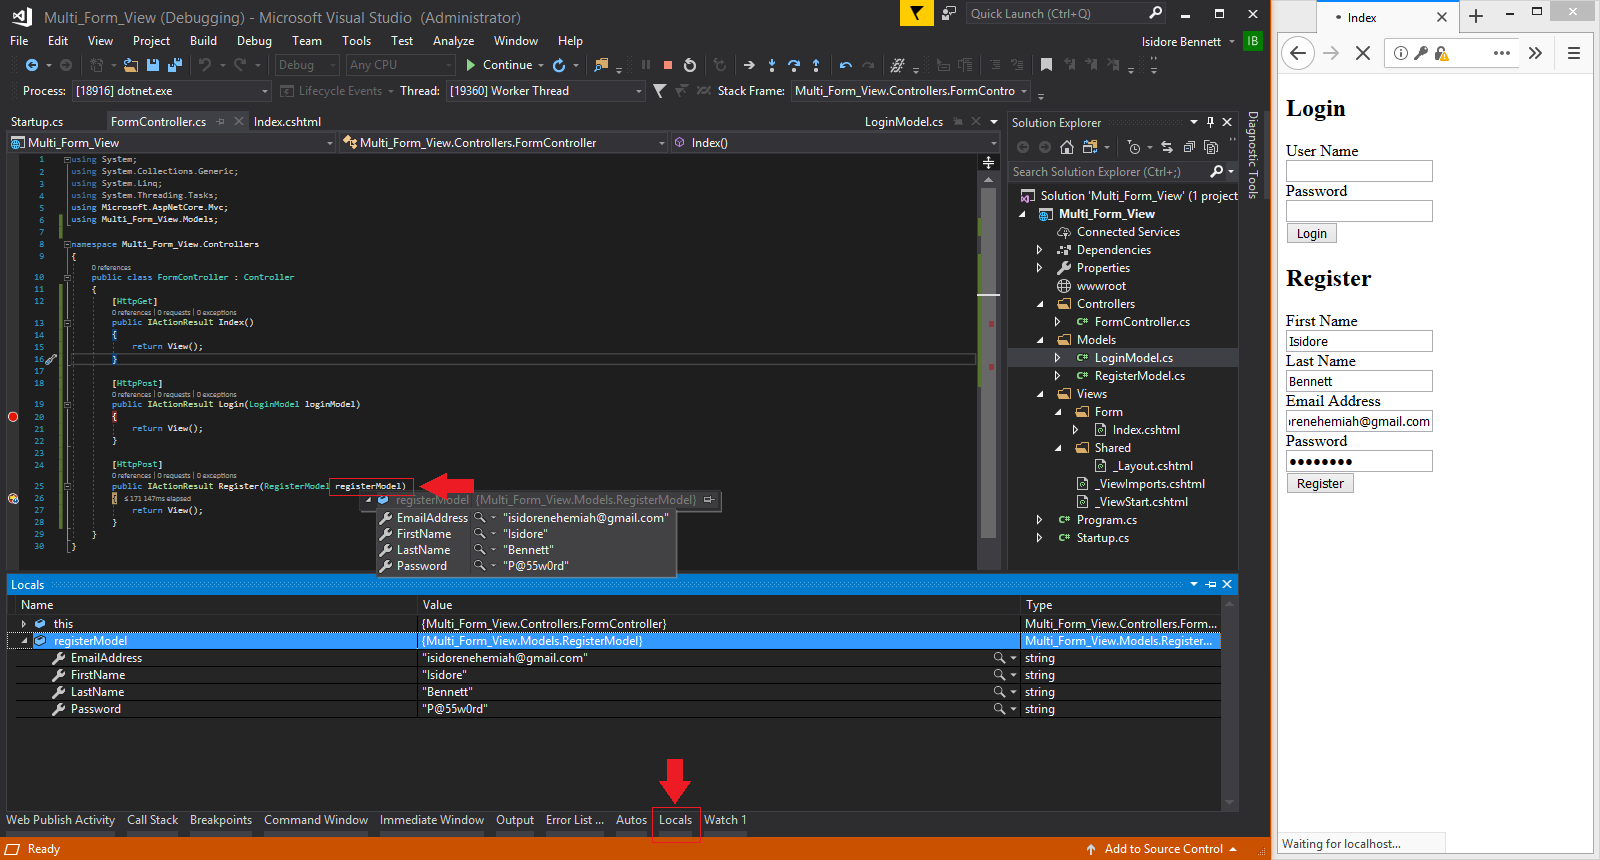
There are a few ways to inspect data that I know of; you're able to hover over the variable you want to inspect,
registerModel in this case until it displays a contextual dropdown that you're able to drilldown in or, you're
able to inspect the data in the Locals window.
As you can see the data we posted from our form has been successfully posted to our Controller and was even processed by
the correct Action or method, our Register Action.
Click on Continue to continue with our debugging.

We should be greeted with a lovely execption message in our browser that will either say:
- InvalidOperationException: The view 'Register' was not found. The following locations were searched:
- /Views/Form/Register.cshtml
- /Views/Shared/Register.cshtml
- /Pages/Shared/Register.cshtml
or
- InvalidOperationException: The view 'Register' was not found. The following locations were searched:
- /Views/Form/Login.cshtml
- /Views/Shared/Login.cshtml
- /Pages/Shared/Login.cshtml
depending on the form you decide to post.
We see this exception because when we had returned our View in our Login and Register methods, our methods assume that
we have a corresponding View for those specific methods.
To rectify this problem we need to direct the method to the Index View instead of a Register or Login View that does
not exist. To do this, open the FormController.cs file and replace return View(); with
return View("Index");. Your code should look like this:
- [HttpGet]
- public IActionResult Index()
- {
- return View();
- }
- [HttpPost]
- public IActionResult Login(LoginModel loginModel)
- {
- return View("Index");
- }
- [HttpPost]
- public IActionResult Register(RegisterModel registerModel)
- {
- return View("Index");
- }
Try resubmitting either form and you should be redirected to the Index View with no errors.
We didn't do anything with the data like validation and so on because I wanted to focus on the concept of having multiple forms in a single View.
I hope this article has educated or at the very least provided answers to the questions you had. Please leave a comment
or contact me directly if you like.
Thanks for reading.