Scenario
Okay people, we're not going to go too crazy with this scenario. You just want to send a simple email, a Recipient,
a Subject, a Body, and that's it.
This is my story.
Overview
In this article I will cover and attempt to explain some concepts about sending emails using ASP.NET MVC. We will learn a little about SMTP Servers or at the very least learn how to choose which one we want to use for ourselves.
Creating the Project
For this project, I used Visual Studio 2017. The process should be the same for earlier versions. Open VS then go to File > New > Project...:
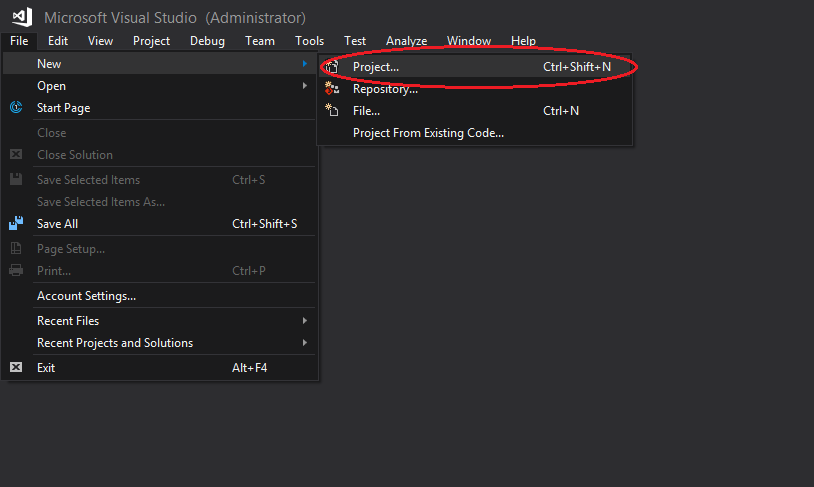
and a "New Project" window should pop up. In the New Project window:
- Select the language, preferably Visual C#, then click on "Web".
- Then select ASP.NET Core Web Application.
- Name your application.
- Select your project's destination.
- Finally, click "OK" to confirm.
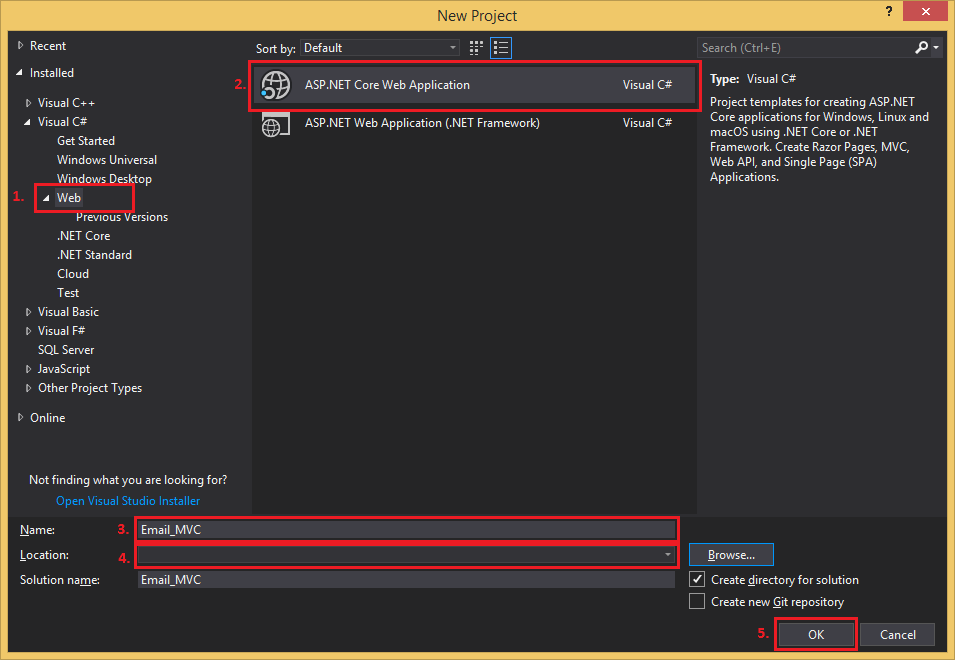
Next, a "New ASP.NET Core Web Application - [Application Name Here]" window will pop up. I will be using the .NET Core framework and version 2.1 for this example. Now we will choose the type of web application:
- Click on "Empty".
- And then on "OK" to complete the application creation process.
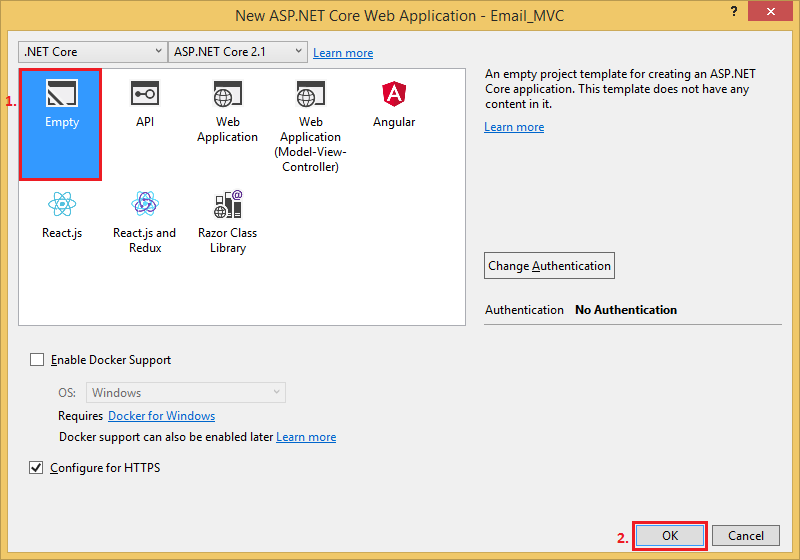
We chose an empty project because we didn't need all the scaffolding that came with the MVC (Model-View-Controller) template but because the project is empty we will create most things from scratch.
Project Setup
In this section, we'll set up our project. Here we'll be configuring our web application so that we can use things like static files (important), MVC (importanter) and routing (not as important but always nice to have).
Open up your "Startup.cs" file and remove the following lines of code:
- app.Run(async (context) =>
- {
- context.Response.WriteAsync("Hello World!");
- });
Before we removed these lines of code, we could've ran our project and the browser would've displayed "Hello World!". So we remove this because we don't really want to see that string of text when we start running and debugging our project.
Next, we'll be doing some config.
Firstly we're going to include the MVC service. Add services.AddMvc(); to the
public void ConfigureServices(IServiceCollection services) method. Your method should look
something like this:
- public void ConfigureServices(IServiceCollection services)
- {
- services.AddMvc();
- }
Finally, we will set up the routing. Add the following lines of code to the
public void Configure(IApplicationBuilder app, IHostingEnvironment env) method:
- app.UseMvc(routes =>
- {
- routes.MapRoute(
- name: "default",
- template: "{controller=Email}/{action=Index}/{id?}");
- });
Your method should look like this if you haven't removed the the condition that checks whether the project is in Development or not:
- public void Configure(IApplicationBuilder app, IHostingEnvironment env)
- if (env.IsDevelopment())
- {
- app.UseDeveloperExceptionPage();
- }
-
- app.UseMvc(routes =>
- {
- routes.MapRoute(
- name: "default",
- template: "{controller=Email}/{action=Index}/{id?}");
- });
- }
Creating Files and Folder Structure
This section will be about the creation of the basic MVC skeleton folder structure. We'll also create files that will be later needed like the model, View and controller as well as the layout, View Import and View Start.
Folder Structure
First the folder structure:
- Right-click on the project name (Email_MVC in this case).
- Click/hover on "Add".
- Then click on "New Folder" (name the new folder "Models").
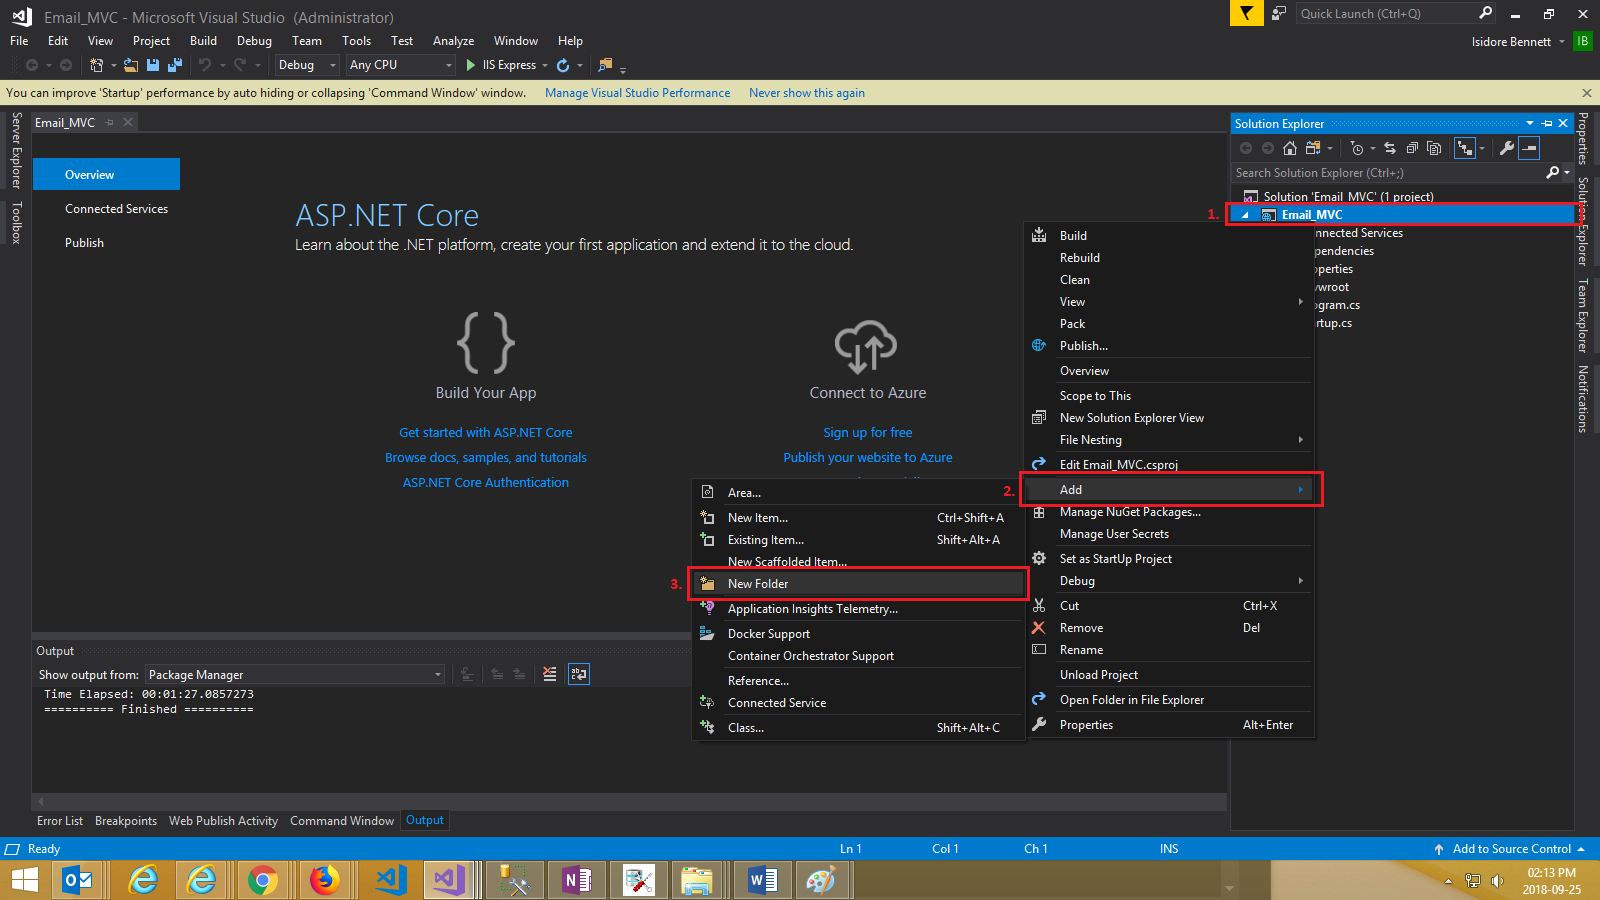
Repeat the above steps 2 more times, name these folders "Views" and "Controllers" respectively.
And again, do this 2 more times in the "Views" folder and call the new folders "Email" and
"Shared" respectively.
If done correctly, your folder structure should look something like this:
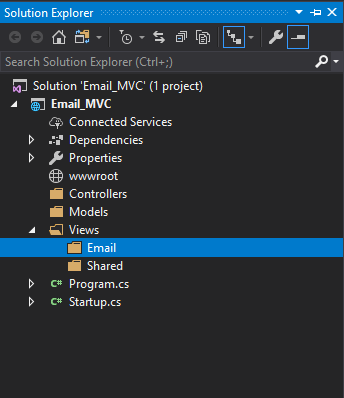
File Creation
Now we'll be adding our files. First, the easier one to find, the Model which is basically a class.
Model
- Right-click on the "Models" folder.
- Click/hover on "Add".
- Click on "Class...".
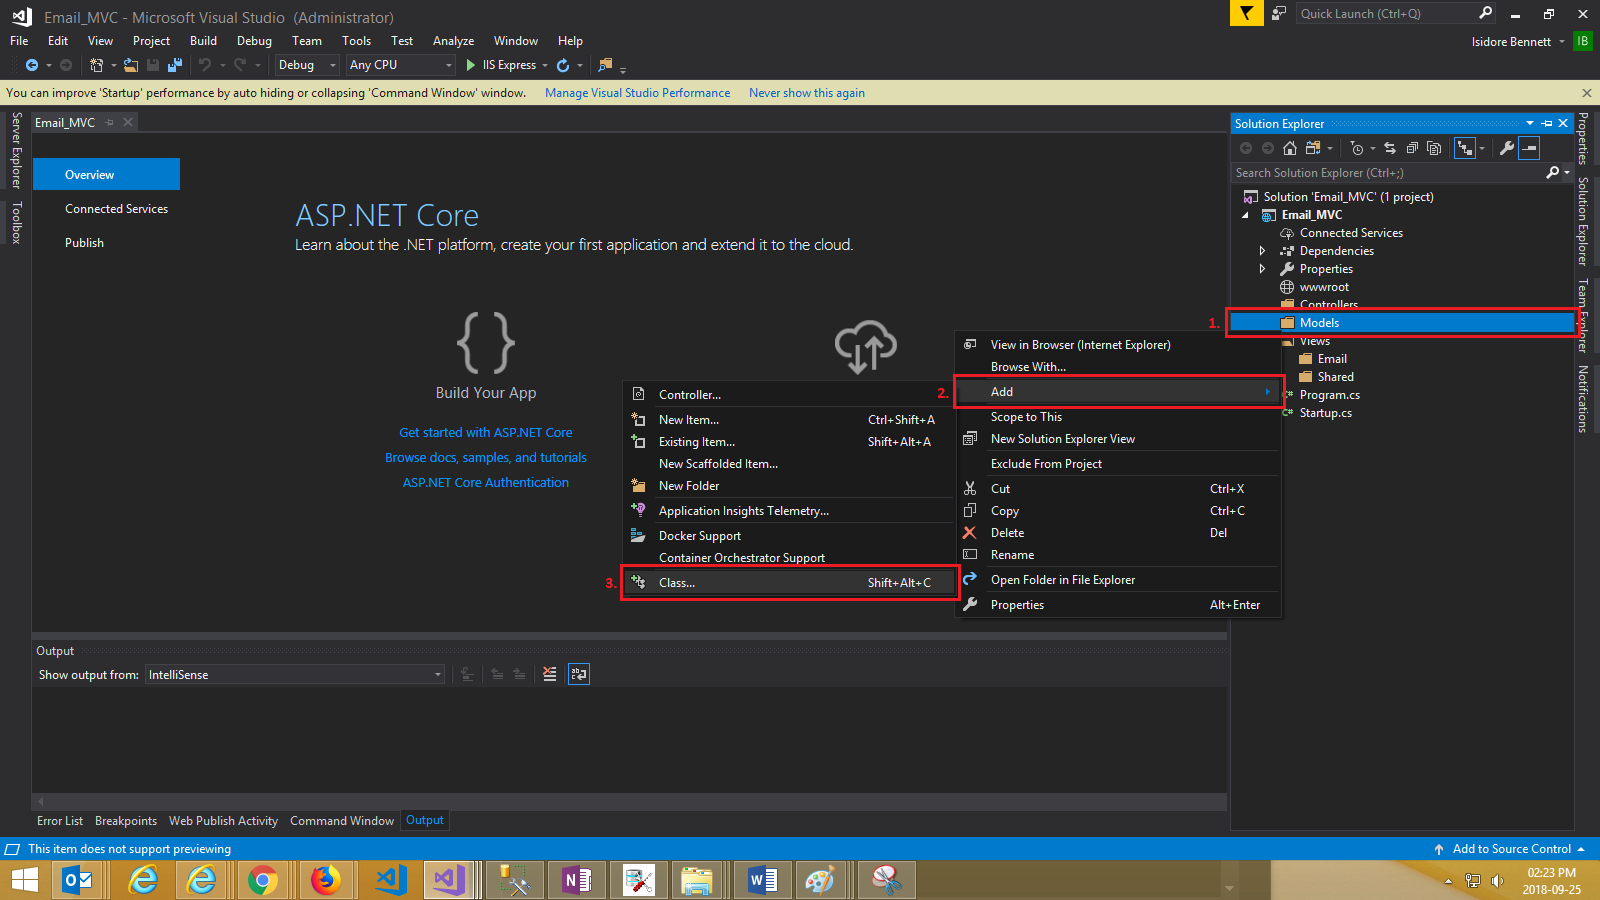
Then you should be greeted with a popup window:
- Click on "Class" if it wasn't already selected.
- Name your class so that it would easily describe your Model. We'll be making an Email Model. We'll call it EmailModel.
- Click "Add".
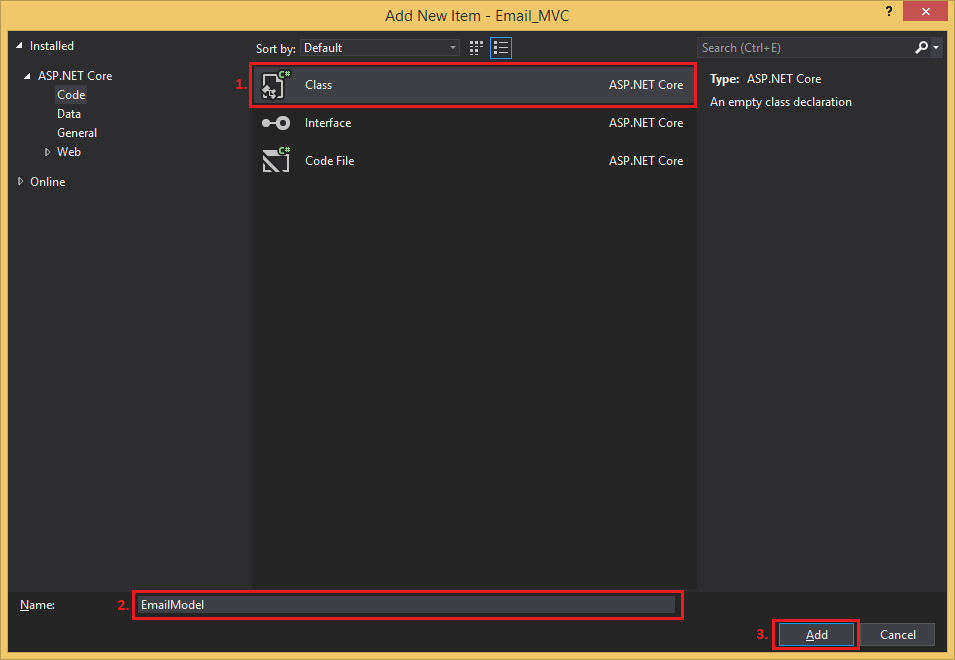
Controller
The Controller next:
- Right-click on the "Controllers" folder.
- Click/hover on "Add".
- Click on "Controller...".
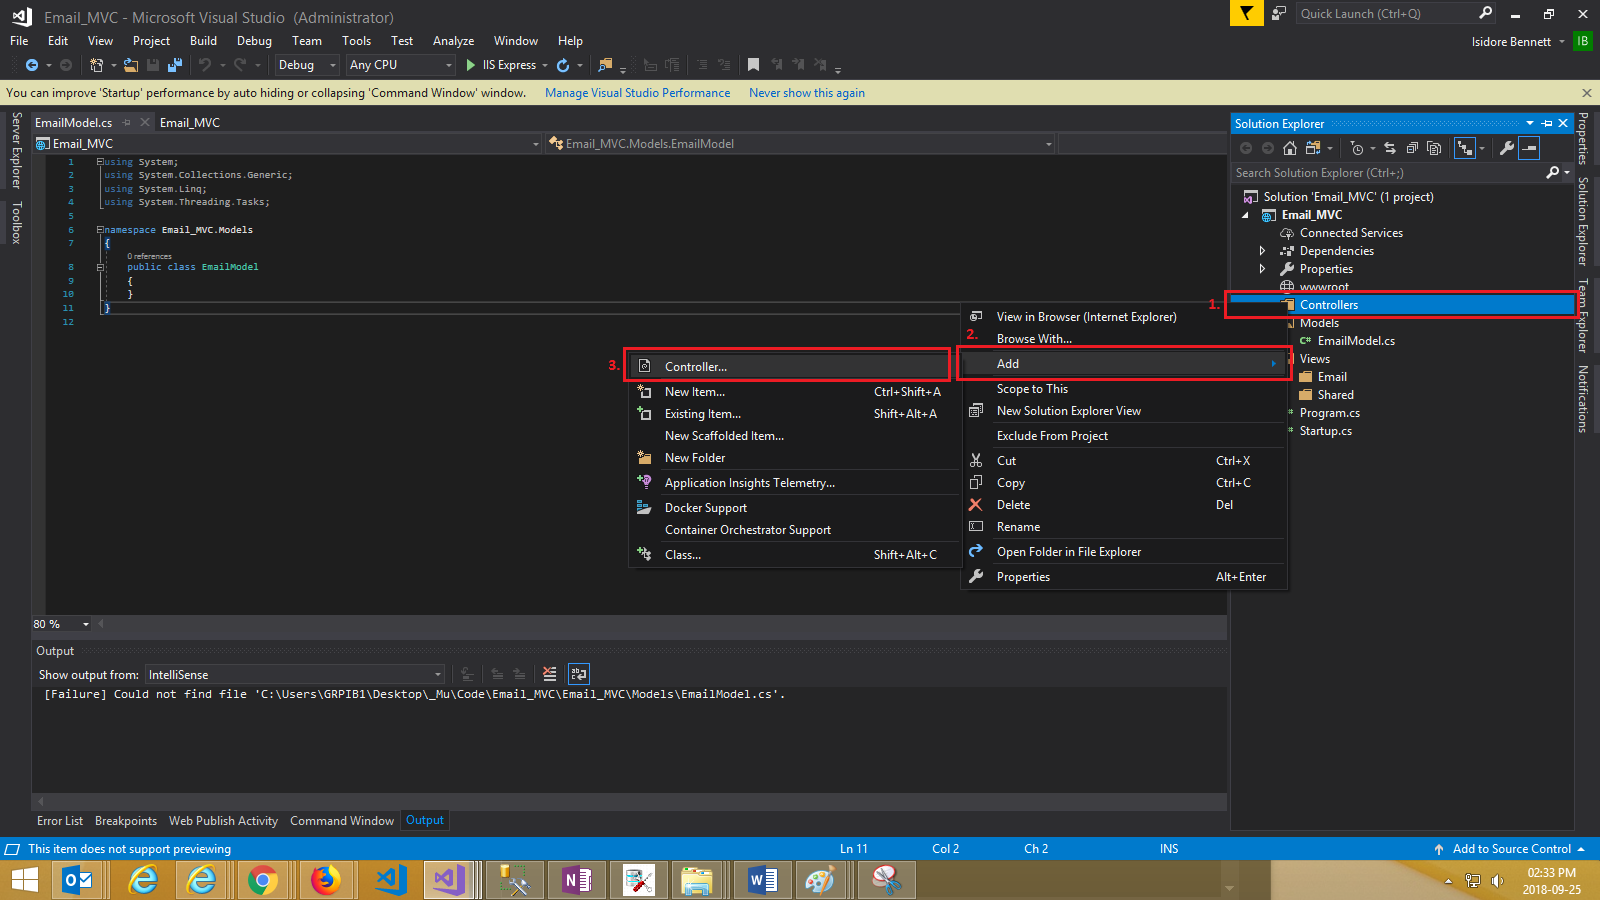
You'll see an "Add Scaffold" window pop up:
- Click on "MVC Controller - Empty"
- and then on "Add".
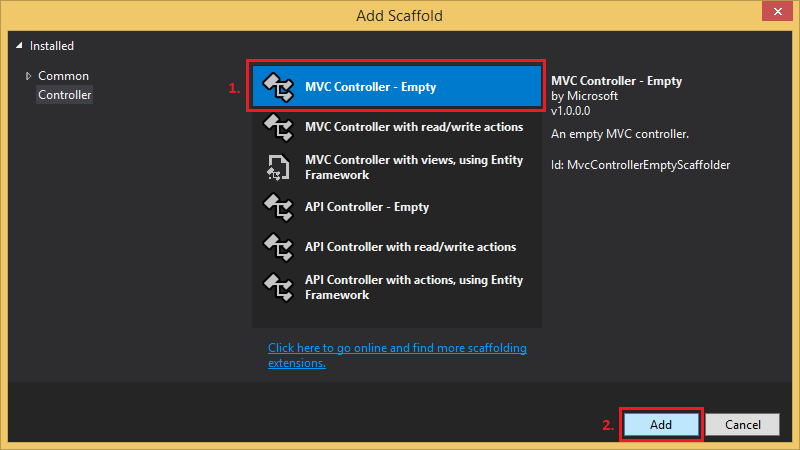
And now you'll see another window that will prompt you to name your controller:
- Name it "EmailController"
- then click on "Add".

View
Now we'll add the final part to the MVC trinity, the View (I know I know, I got the order wrong):
- Right-click on the "Email" folder that's located in the "Views" folder.
- Click/hover on "Add".
- Click on "View...".
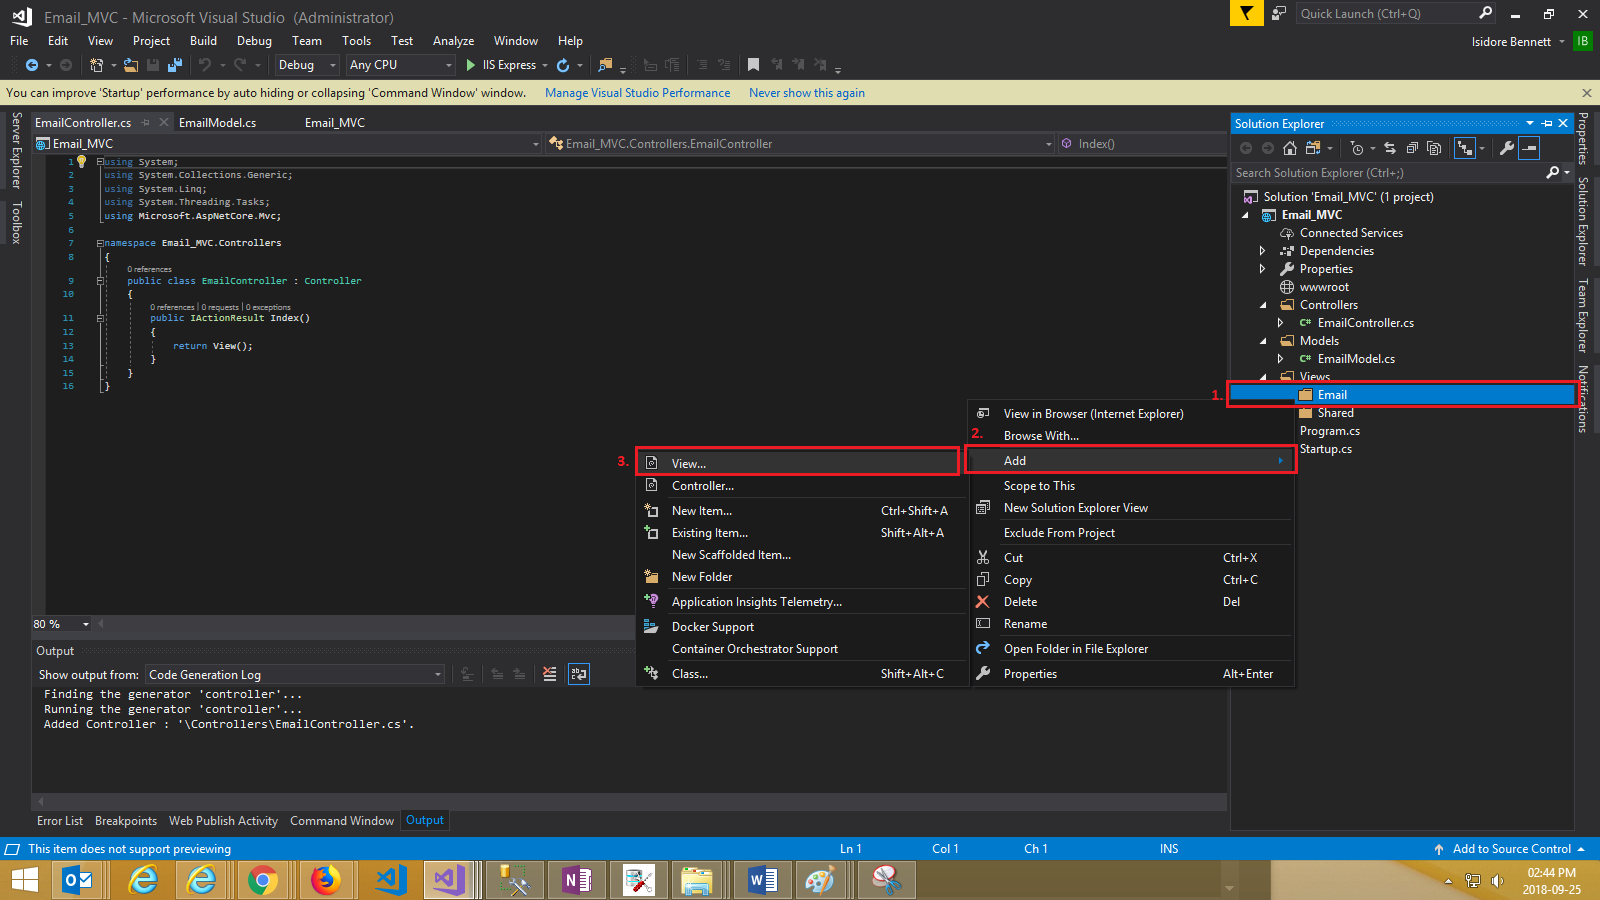
An "Add MVC View" window should pop up:
- Name the View "Index"
- then conclude the View creation by clicking on "Add".
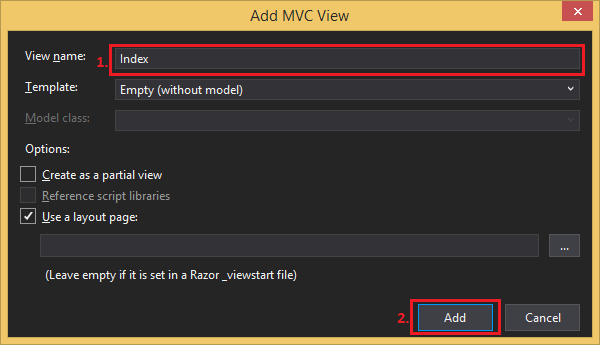
Although this concludes the creation of the MVC files (being the Model, the View and, the
Controller), we still have a few more items to add.
Also, notice how we have an error in our newly created View. We will include the file that will
rectify that in the next step.
_ViewImports
The _ViewImports file will allow us to use things like tag helpers and allow us to import our Models with using statements, among other things, but for now, we're just going to use it for tag helpers. This will also remove the error we saw earlier in our View:
- Right-click on the "Views" folder.
- Click/hover on "Add".
- Click on "New Item...".
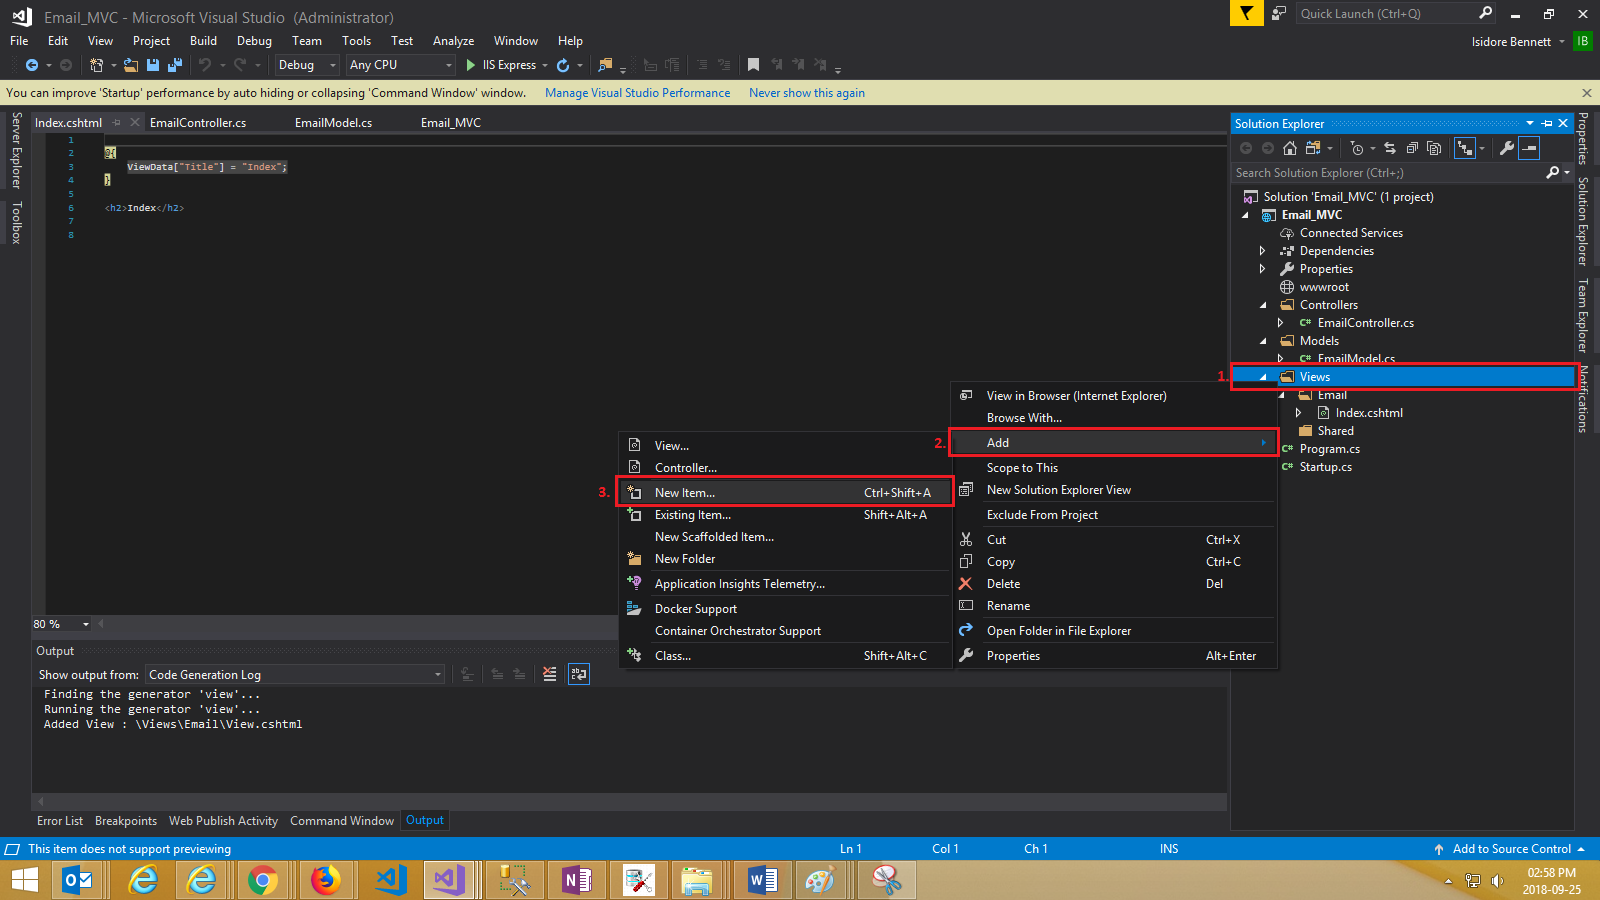
When the "And New Item" window pops up:
- Click on Web in the left pane.
- Look for and click on "Razor View Imports".
- Click on "Add".
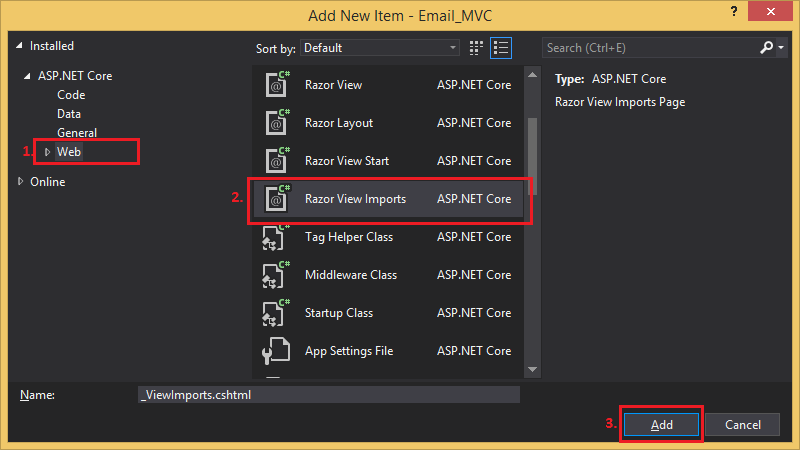
There's no need to rename the file so we'll leave it as is. Your _ViewImports.cshtml should be
open but if it's not, open it and add this line of code
@addTagHelper "*, Microsoft.AspNetCore.Mvc.TagHelpers" and save. If you open up the
View now the error should be gone but if not, just close then open it.
_ViewStart
This is more of a "nice to have" item compared to the others we've created thus far. It will allow us to specify a default layout to be used by our View. If we don't create the "_ViewStart" file we'd have to explicitly specify which Layout we'd want use which is okay for now because we only have one View but if we had more Views we'd have to do this for every View.
To create the "_ViewStart" file, follow the "_ViewImports" creation process but instead of
selecting "Razor View Imports", select "Razor View Start". And just like before, leave the name as
is.
Notice how the newly created "_ViewStart" has this line @{ Layout = "_Layout"; }
already? This line of code is calling a "_Layout" layout as a default for our Views. We'll create
this file next.
_Layuot
The "_Layout" kinda acts like a template, it helps with DRY principles which is nice.
To create the "_Layout" file, follow the previous two creation processes but instead this time add the file to the "Shared" folder and instead of selecting "Razor View Imports" or "Razor View Start", select "Razor Layout". And just like before, leave the name as is.
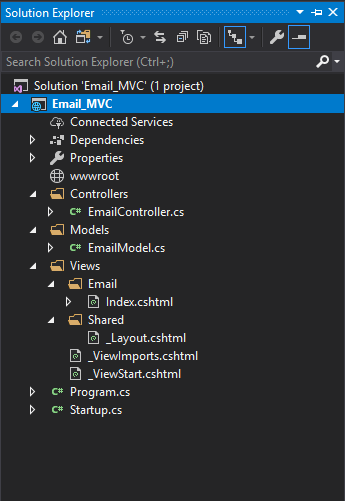
Before we move on to our logic, make sure that your project's file structure resembles this one:
Logic
Now for coding the logic. We'll be setting up our Model, our View and our Controller.
Model
Open your "EmailModel.cs" and add the following lines of code to the public class EmailModel
class:
- public string Name { get; set; }
- public string Addess { get; set; }
- public string Subject { get; set; }
- public string Body { get; set; }
Of course, you're more than free to add other properties like "Surname" for example. Adding "Name" might be too much as well but we'll just leave it for demonstration purposes.
View
We're gonna build a quick form, one that will take in the person's name, their email adress, the subject of the email and then the body of the email. The form should basically mimic the EmailModel so if you added more properties above and wish to assign values to them, you should add form fields for each property.
Add these lines of code to your "Index.cshtml":
- @using (Html.BeginForm("Index", "Email", FormMethod.Post))
- {
- <label asp-for="Name">Name</label>
- <br />
- <input asp-for="Name" type="text" name="Name" />
- <br />
- <label asp-for="Addess">Addess</label>
- <br />
- <input asp-for="Addess" type="text" name="Addess" />
- <br />
- <label asp-for="Subject">Subject</label>
- <br />
- <input asp-for="Subject" type="text" name="Subject" />
- <br />
- <label asp-for="Body">Body</label>
- <br />
- <input asp-for="Body" type="text" name="Body" />
- <br />
- <button type="submit">Send mail</button>
- }
At line 1 we're specifying to which Action and Controller the form contents should be sent to, "Index" and "Email" respectively.
Controller
In the controller we will process our data returned by our View upon submission. We will be doing some very basic
email formating as well as sending the email, duh.
In your "EmailController.cs" add the following code:
- [HttpPost]
- public IActionResult Index(EmailModel emailModel)
- {
- SmtpClient smtpClient = new SmtpClient("smtp.gmail.com", 587);
- MailMessage mailMessage = new MailMessage();
- smtpClient.Credentials = new NetworkCredential
- {
- UserName = "[Your email address]",
- Password = "[Your password]"
- };
-
- smtpClient.EnableSsl = true;
- smtpClient.DeliveryMethod = SmtpDeliveryMethod.Network;
-
- mailMessage.From = new MailAddress("[Your email address]");
- mailMessage.To.Add("[Email address you're sending to]");
- mailMessage.Subject = emailModel.Subject;
- mailMessage.Body = string.Format("{0} {1}", emailModel.Addess, emailModel.Body);
-
- smtpClient.Send(mailMessage);
-
- return View();
- }
-
In line 1 we want to specify that the form data needs to be posted to our action or method so we decorate our
method with
[HttpPost]. This will also call the desired method upon posting. - Line 2 we parameterize (yes, that's a word) our method with our EmailModel. The Model is populated by our form when we submit.
- Line 4 we set up and initialize our SMTP Client. If you want to send from a Gmail email address then you'd use a Gmail SMTP Server. Arclab has a noice list of SMTP Servers and their respective ports, it's pretty comprehensive too.
-
Line 5 we just instanciate
MailMessageor make an instance of. - Lines 6 to 10 are where we specify the credientials of the email address that will be sending the emails. So an actual email and it's actual password are needed. You can use a web config to store this formation or just be lazy and hardcode it here, that's obviously not advised... At all. Don't be lazy.
- Line 12 we specify that the SMTP Client should use SSL (Secure Socket Layer) encryption.
-
We want our email to be sent over the network, so in line 13 we set the
DeliveryMethodto Network. More info on this at Stackoverflow. - Lines 15, 17 and 18 are pretty straight forward. We specify where the emails is sent From, the Subject and the Body of the email. Because we don't really have a use for the users email, we just include it in the body. You're more than welcome to use the users email at line 16.
-
Line 16 is a little different from the other three lines as
mailMessage.Tois a collection. So we add recipients to the mailing list. To add more emails, repeat this line of code with the email addresses you wish to send the email to. - Then finally at line 18 we send our email.
In conclusion, the above code does what it's supposed to but it doesn't handle exceptions or check the validity of our Model State. It's recommended to incorporate these measures in your application. I'll be sure to add them in the downloadable project below to give you an idea of what it should look like.
I hope this article was insightful and that you learned as much as I did. Please feel free to comment and ask any
questions or even leave suggestions.
Thanks for reading.