Scenario
Imagine you don't have access to any type of database infrastructure but your MVC web application either
needs to read or write to a persistent data source. It might be a complex data structure like a person's
details (very complex indeed) or something as flat as only storing and reading dates and appointments.
I found myself without access to a database especially when deploying to Azure with a free account. Sigh.
I've been looking for free online SQL DBs to no avail so I diverted my attention to finding some sort of
persistent file I could read and/or write from, like a text file you know. And that's when I found it,
JSON! Not as pretty as a tabular representation of data but a hierarchical representation isn't exactly
ugly.
This is my story.
Overview
In this article, I will attempt to walk you through the process of doing some CRUD operations on a JSON file which would essentially mimic a database. We will be using ASP.NET MVC and C# for this example as well as JSON and maybe some Razor for displaying of data.
Creating the Project
For this project, I used Visual Studio 2017. The process should be the same for earlier versions. Open VS then go to File > New > Project...:
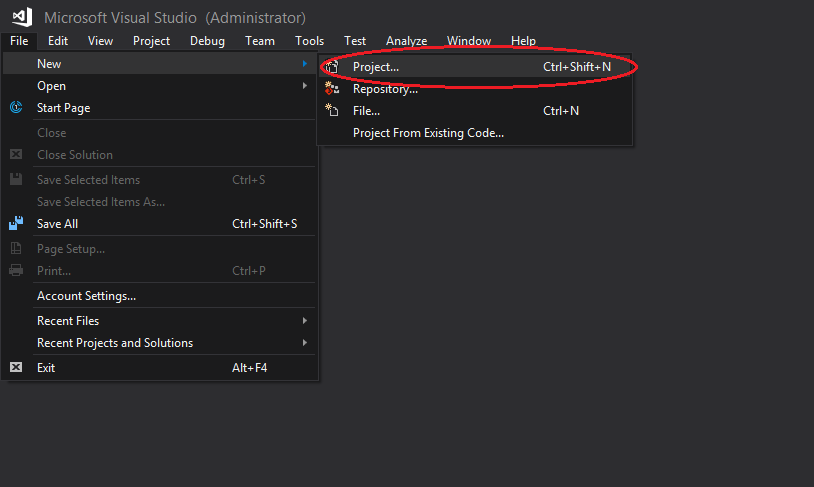
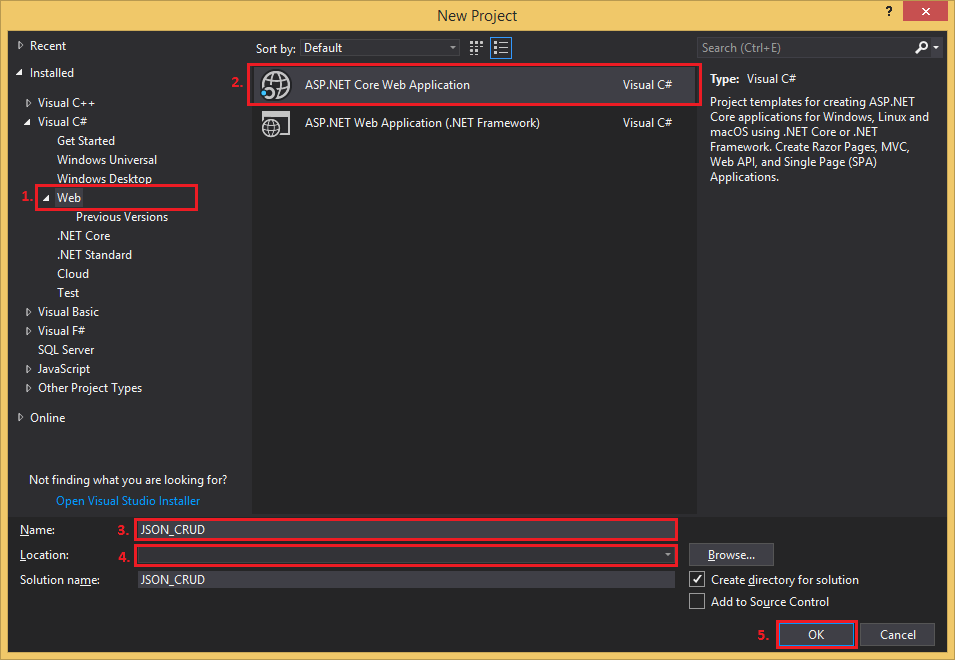
and a "New Project" window should pop up. In the New Project window:
- Select the language, preferably Visual C#, then click on "Web".
- Then select ASP.NET Core Web Application.
- Name your application.
- Select your project's destination.
- Finally, click "OK" to confirm.
Next, a "New ASP.NET Core Web Application - [Application Name Here]" window will pop up. I will be using the .NET Core framework and version 2.1 for this example. Now we will choose the type of web application:
- Click on "Empty".
- And then on "OK" to complete the application creation process.
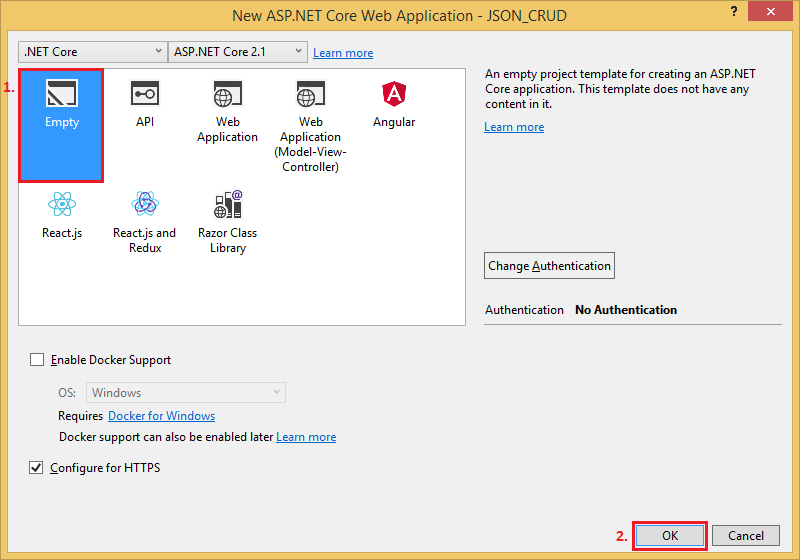
We chose an empty project because we didn't need all the scaffolding that came with the MVC (Model-View-Controller) template but because the project is empty we will create most things from scratch.
Project Setup
In this section, we'll set up our project. Here we'll be configuring our web application so that we can use things like static files (important), MVC (importanter) and routing (not as important but always nice to have).
Open up your "Startup.cs" file and remove the following lines of code:
- app.Run(async (context) =>
- {
- context.Response.WriteAsync("Hello World!");
- });
Before we removed these lines of code, we could've ran our project and the browser would've displayed "Hello World!". So we remove this because we don't really want to see that string of text when we start running and debugging our project.
Next, we'll be doing some config.
Firstly we're going to include the MVC service. Add services.AddMvc(); to the
public void ConfigureServices(IServiceCollection services) method. Your method should look
something like this:
- public void ConfigureServices(IServiceCollection services)
- {
- services.AddMvc();
- }
Finally, we'll enable our web app to use static files, this will later allow us to access our JSON file(s),
and then we will set up the routing as well.
Add the following lines of code to the
public void Configure(IApplicationBuilder app, IHostingEnvironment env) method:
- app.UseStaticFiles();
and
- app.UseMvc(routes =>
- {
- routes.MapRoute(
- name: "default",
- template: "{controller=Person}/{action=Index}/{id?}");
- });
Your method should look like this if you haven't removed the the condition that checks whether the project is in Development or not:
- public void Configure(IApplicationBuilder app, IHostingEnvironment env)
- if (env.IsDevelopment())
- {
- app.UseDeveloperExceptionPage();
- }
-
- app.UseStaticFiles();
-
- app.UseMvc(routes =>
- {
- routes.MapRoute(
- name: "default",
- template: "{controller=Person}/{action=Index}/{id?}");
- });
- }
Creating Files and Folder Structure
This section will be about the creation of the basic MVC skeleton folder structure. We'll also create files that will be later needed like the model, View and controller as well as the layout, View Import and View Start.
Folder Structure
First the folder structure:
- Right-click on the project name (JSON_CRUD in this case).
- Click/hover on "Add".
- Then click on "New Folder" (name the new folder "Models").
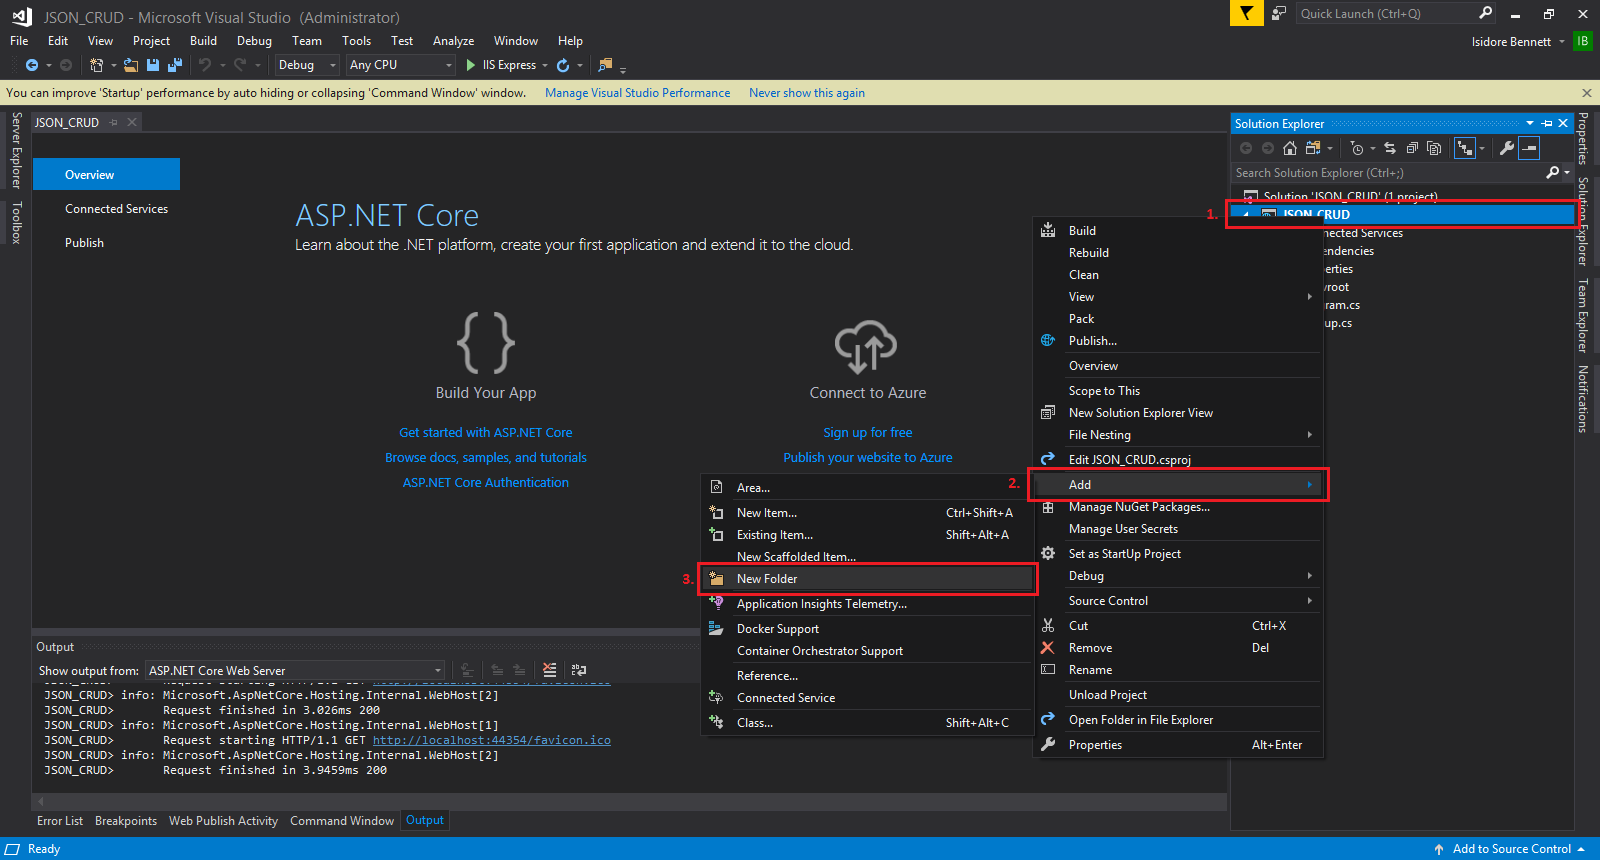
Repeat the above steps 2 more times, name these folders "Views" and "Controllers" respectively. Repeat
the above steps for the "wwwroot" folder, call the new folder "data" and do this 2 more times for the
"Views" folder and call the new folders "Person" and "Shared" respectively.
If done correctly, your folder structure should look something like this:
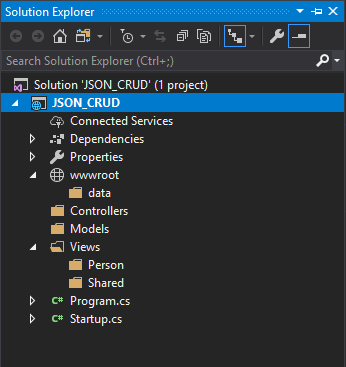
File Creation
Now we'll be adding our files. First, the easier one to find, the Model which is basically a class.
Model
- Right-click on the "Models" folder.
- Click/hover on "Add".
- Click on "Class...".
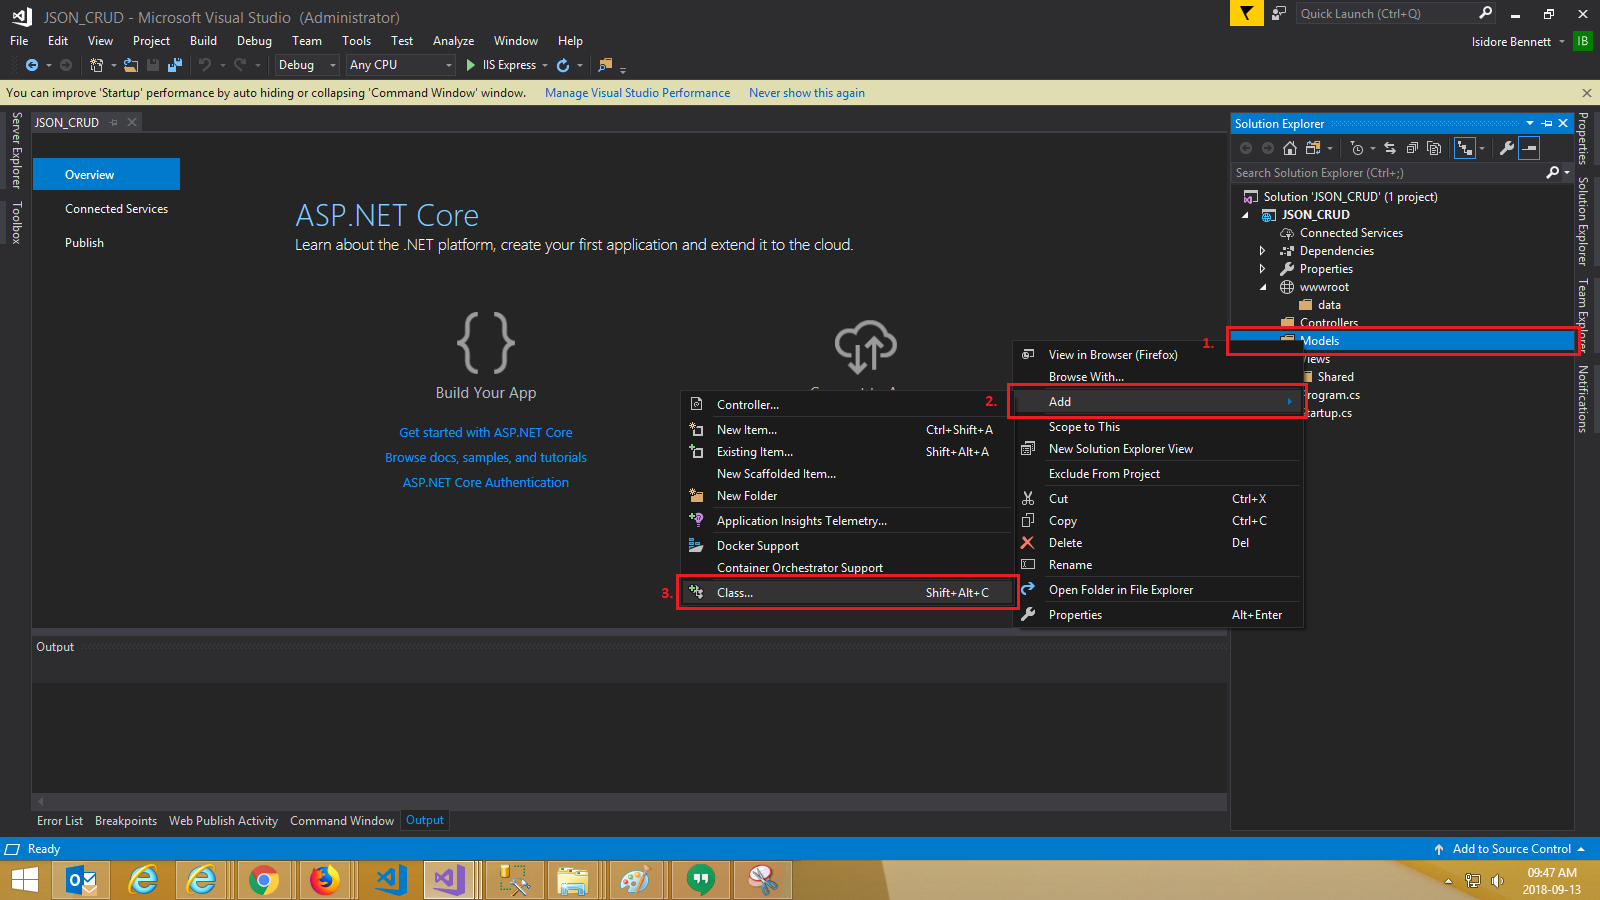
Then you should be greeted with a popup window:
- Click on "Class" if it wasn't already selected.
- Name your class so that it would easily describe your Model. We'll be making a Person Model for simplicity. So we'll call it PersonModel.
- Click "Add".
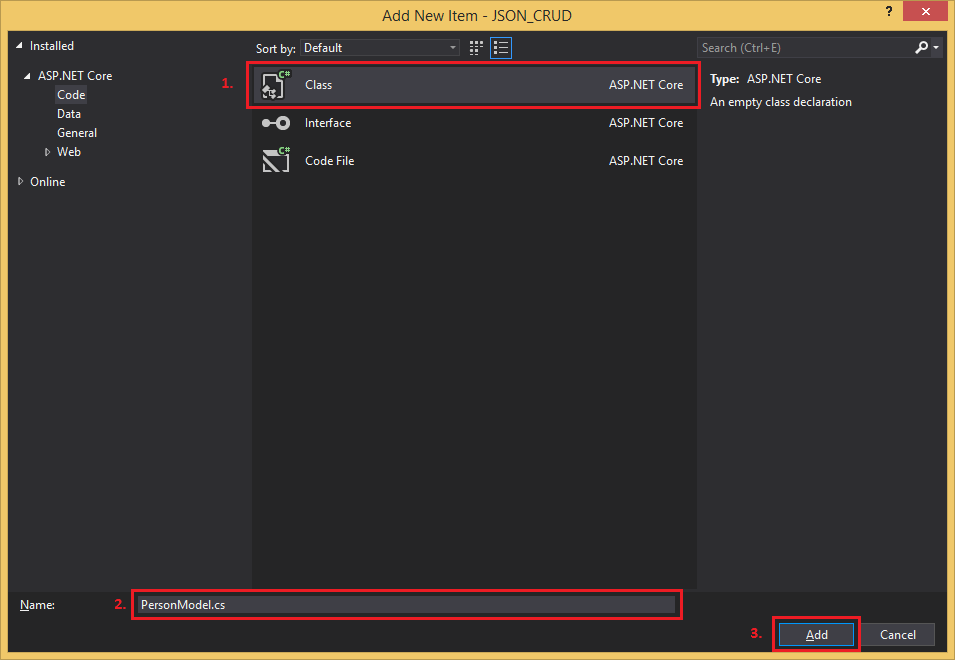
Controller
The Controller next:
- Right-click on the "Controllers" folder.
- Click/hover on "Add".
- Click on "Controller...".
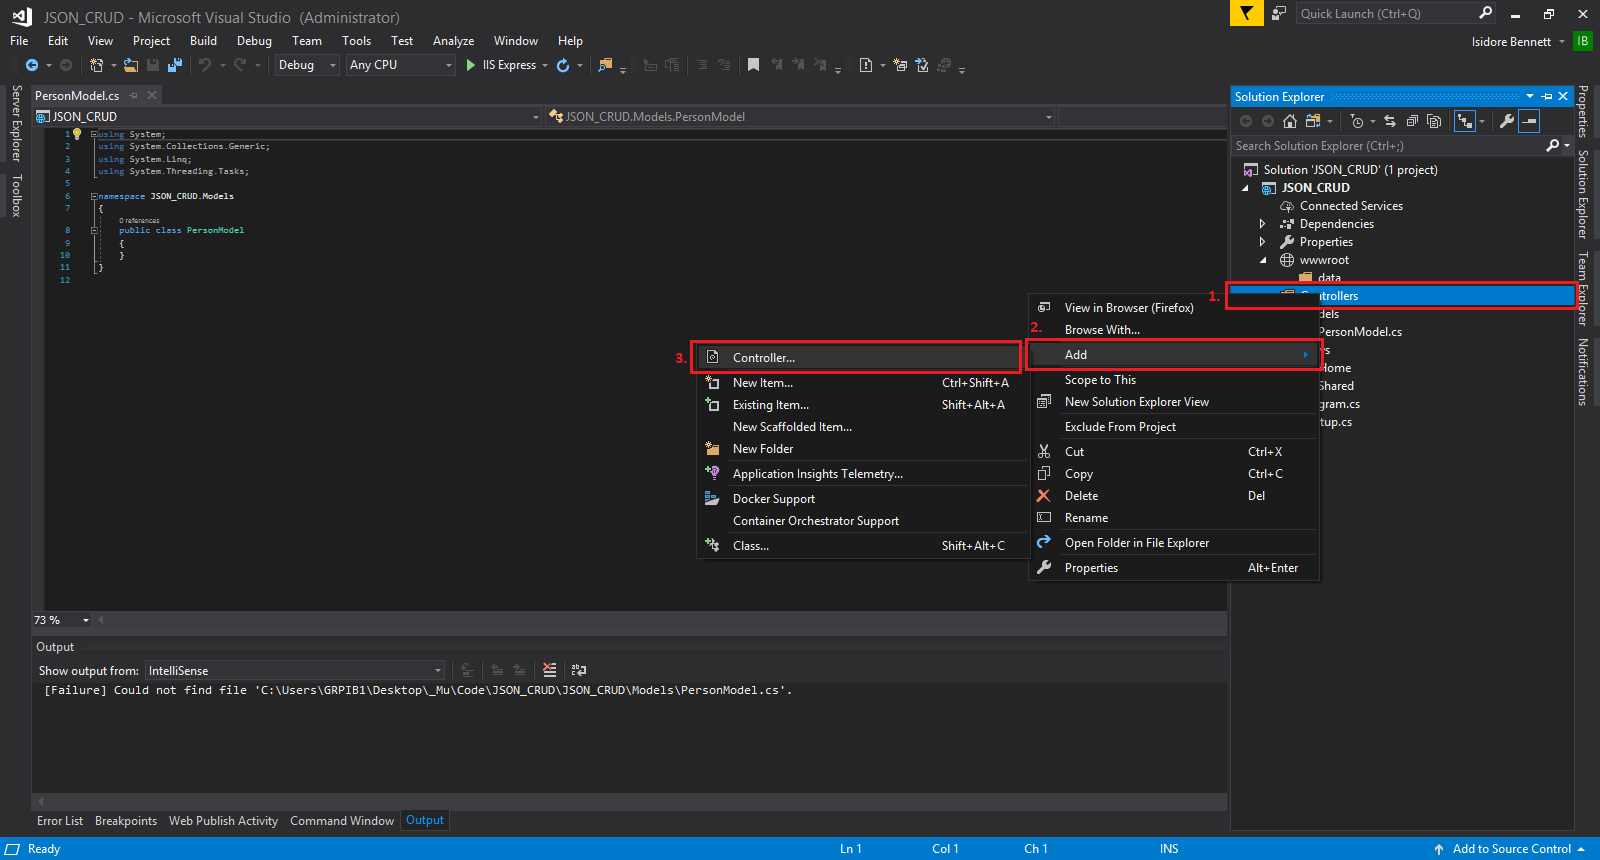
You'll see an "Add Scaffold" window pop up:
- Click on "MVC Controller - Empty"
- and then on "Add".
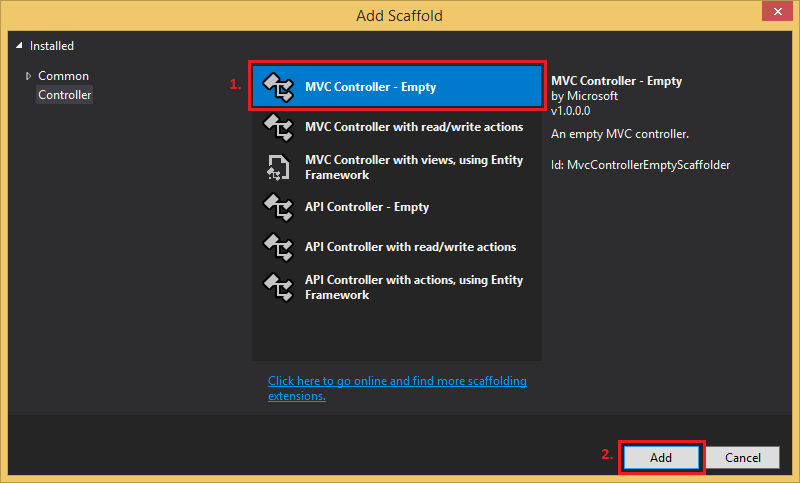
And now you'll see another window that will prompt you to name your controller:
- Name it "PeronController"
- then click on "Add".

View
Now we'll add the final part to the MVC trinity, the View (I know I know, I got the order wrong):
- Right-click on the "Person" folder that's located in the "Views" folder.
- Click/hover on "Add".
- Click on "View...".
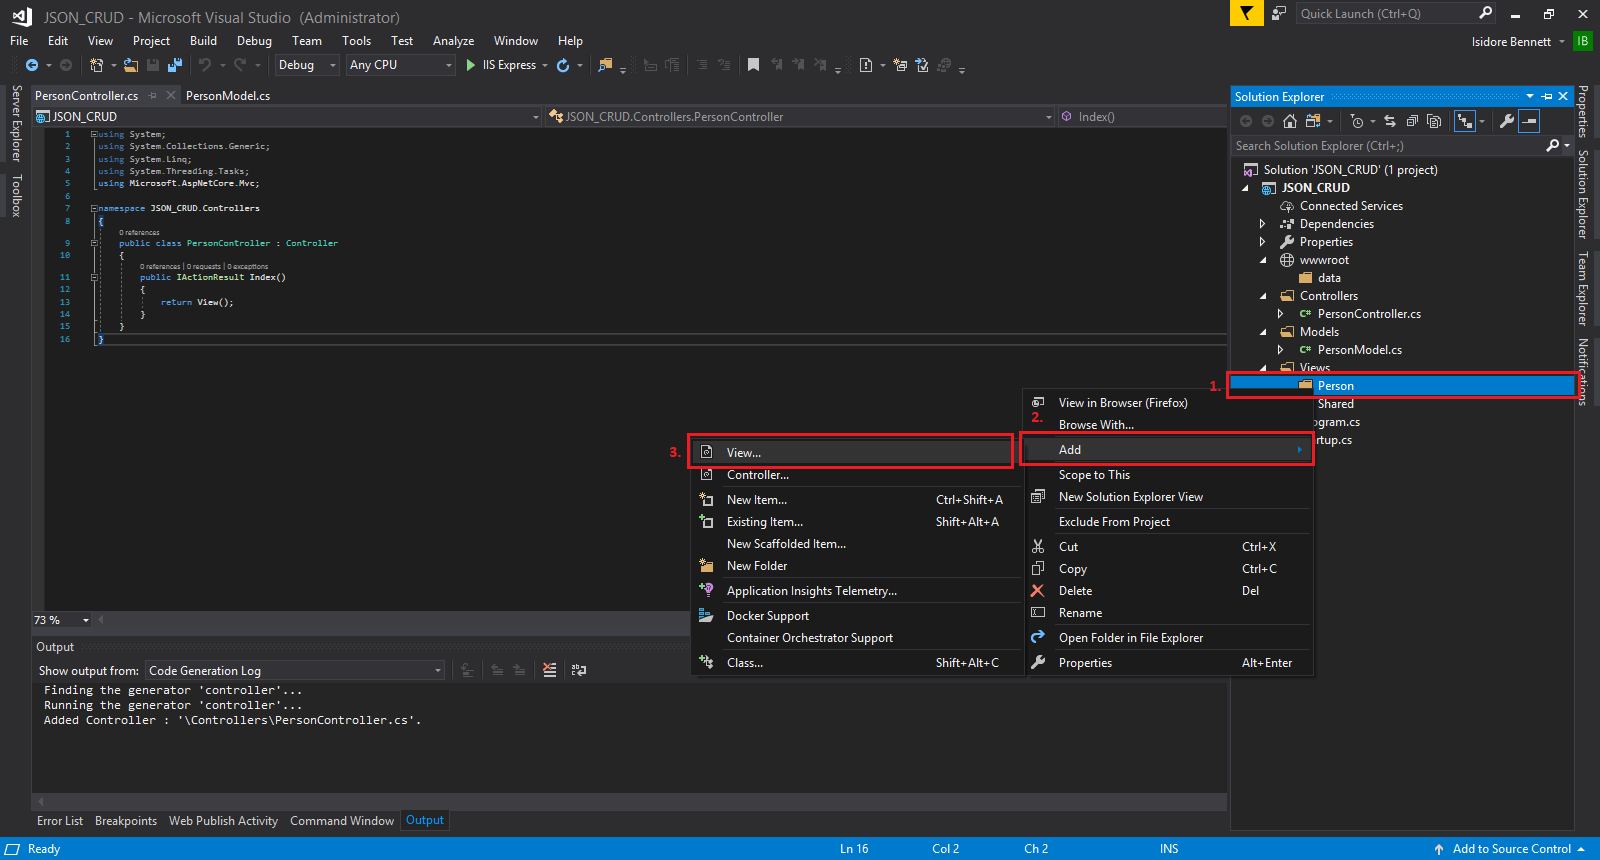
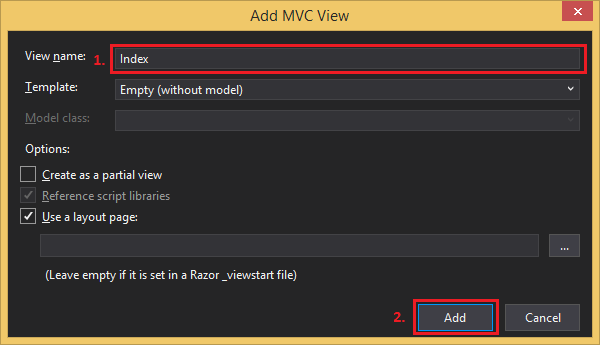
An "Add MVC View" window should pop up:
- Name the View "Index"
- then conclude the View creation by clicking on "Add".
Although this concludes the creation of the MVC files (being the Model, the View and, the
Controller), we still have a few more items to add.
Also, notice how we have an error in our newly created View. We will include the file that will
rectify that in the next step.
_ViewImports
The _ViewImports file will allow us to use things like tag helpers and allow us to import our Models with using statements, among other things, but for now, we're just going to use it for tag helpers. This will also remove the error we saw earlier in our View:
- Right-click on the "Views" folder.
- Click/hover on "Add".
- Click on "New Item...".
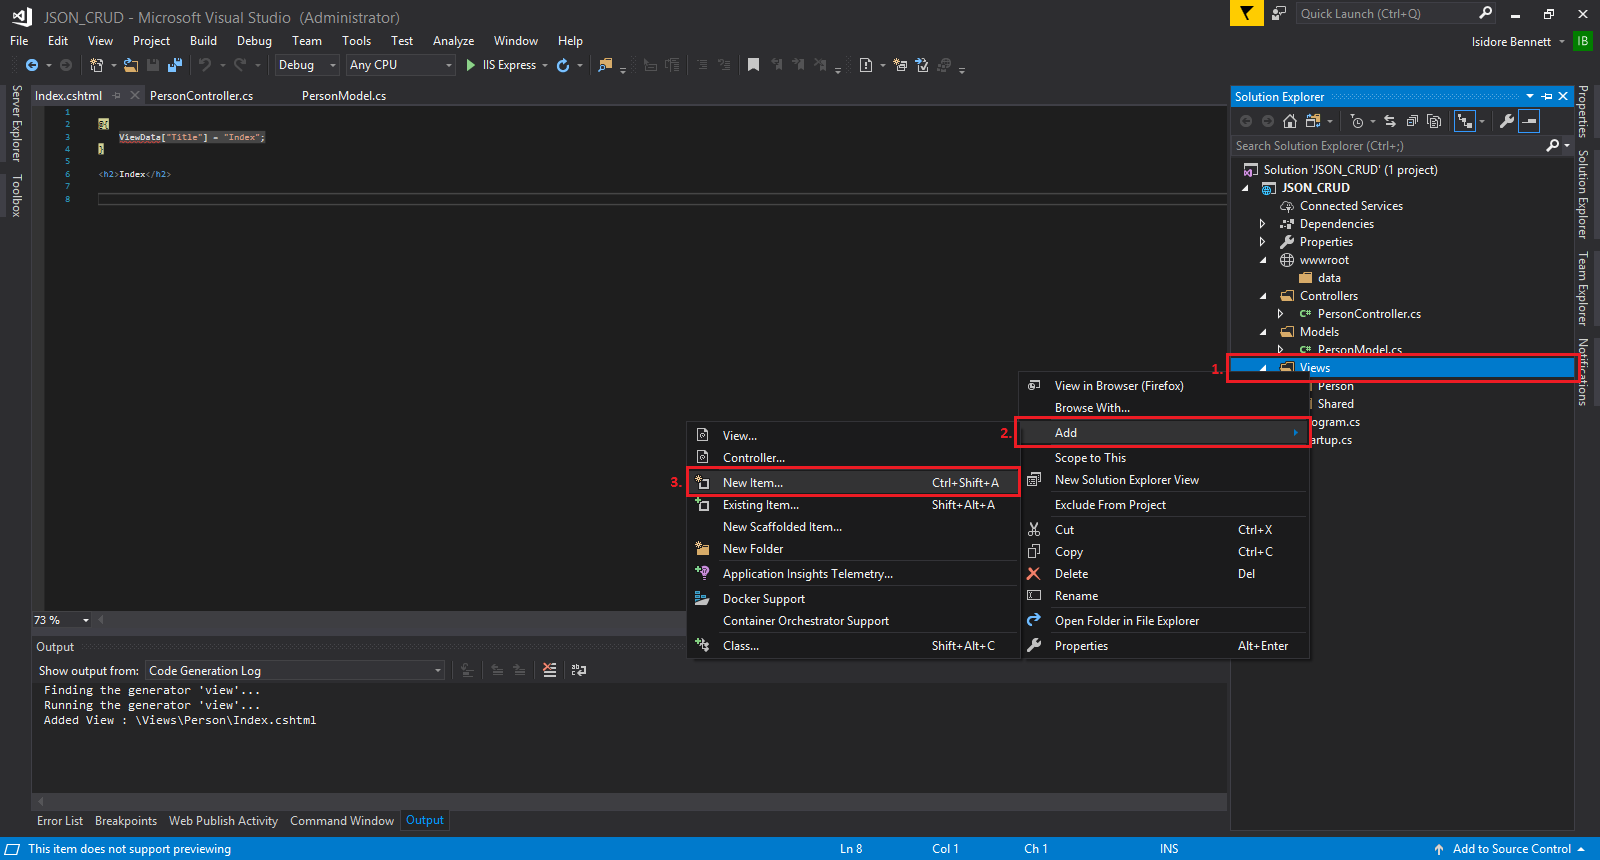
When the "And New Item" window pops up:
- Click on Web in the left pane.
- Look for and click on "Razor View Imports".
- Click on "Add".
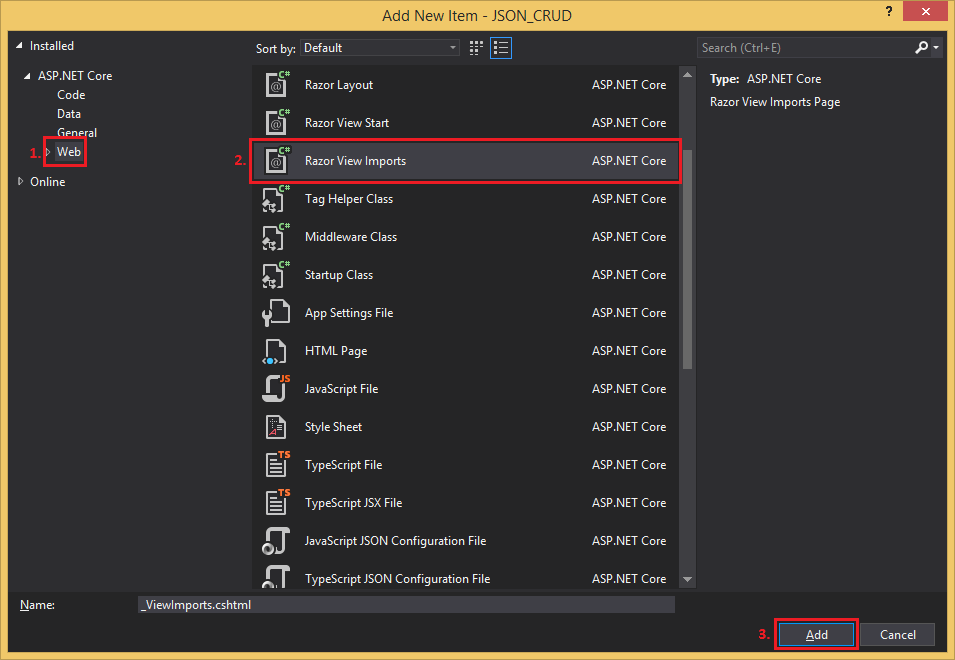
There's no need to rename the file so we'll leave it as is. Your _ViewImports.cshtml should be
open but if it's not, open it and add this line of code
@addTagHelper "*, Microsoft.AspNetCore.Mvc.TagHelpers" and save. If you open up the
View now the error should be gone but if not, just close then open it.
_ViewStart
This is more of a "nice to have" item compared to the others we've created thus far. It will allow us to specify a default layout to be used by our View. If we don't create the "_ViewStart" file we'd have to explicitly specify which Layout we'd want use which is okay for now because we only have one View but if we had more Views we'd have to do this for every View.
To create the "_ViewStart" file, follow the "_ViewImports" creation process but instead of
selecting "Razor View Imports", select "Razor View Start". And just like before, leave the name as
is.
Notice how the newly created "_ViewStart" has this line @{ Layout = "_Layout"; }
already? This line of code is calling a "_Layout" layout as a default for our Views. We'll create
this file next.
_Layuot
The "_Layout" kinda acts like a template, it helps with DRY principles which is nice.
To create the "_Layout" file, follow the previous two creation processes but instead this time add the file to the "Shared" folder and instead of selecting "Razor View Imports" or "Razor View Start", select "Razor Layout". And just like before, leave the name as is.
JSON
Finally, we'll create the most important part of the app.
Add a new file to the "data" folder:
- Click on "Data".
- Click on "JSON File".
- Name the file, we'll call it "people" because it will be containing our peeps.
- Click on "Add"
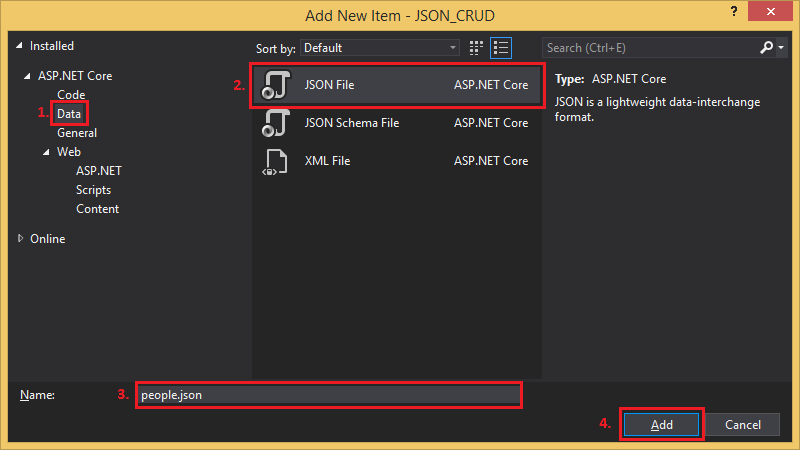
And.
We.
Are.
Done.
Thank you for taking the time to read. Please leave a comment below.
I lied.
But now that we got those things out the way, we'll start with the coding tings next.
Before we move on, make sure that your project's file structure resembles this one:
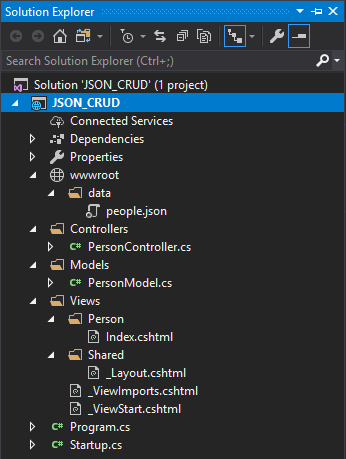
Logic
Now for coding the logic. We'll be setting up our Model, our View and our Controller, as well as pre-populate out JSON file. For simplicity of the project, we'll be doing all our CRUD operations in and from only one View and Controller. Normally we'd do CRUD in more than one View but I feel like us doing this will also be enlightening when it comes to multi form Views and a little about routing. I'm hoping that the simplicity doesn't complicate things in the process.
JSON
First, we'll start with our JSON or "database", if you like. This will help us visualize what our Model needs to look like later because the Model will be relying on our Model at first when we do our Read part of CRUD. I guess we could say that our JSON relies on our Model for the Create, Update and Delete operations of CRUD. It doesn't really matter but, what does matter is that they should resemble each other.
So open your "person.json" file and these lines of code:
- [
- {
- "Id": 123,
- "Name": "Byron",
- "Surname": "Murray",
- "Shoes": [ "Shoe1", "Shoe2"],
- "Hungry": true,
- "Age": 35
- },
- {
- "Id": 234,
- "Name": "Irene",
- "Surname": "Franklin",
- "Shoes": [ "shoe5", "shoe6" ],
- "Hungry": true,
- "Age": 22
- },
- {
- "Id": 345
- "Name": "Jake",
- "Surname": "Harper",
- "Shoes": [ "shoe7", "shoe8", "shoe9" ],
- "Hungry": false,
- "Age": 34
- }
- ]
For now, we'll only add three of your best friends. You're free to add more as long as the structure is adhered to.
I tried to cover some common data types as well as a collection (Shoes) that isn't fixed length. So our Person objects aren't exactly flat and are a bit more complex. I went with this example to hopefully show how to handle a more complex scenario.
Model
Open your "PersonModel.cs" and add the following lines of code to the public class PersonModel
class:
- public int Id { get; set; }
- public string Name { get; set; }
- public string Surname { get; set; }
- public List<string> Shoes { get; set; }
- public bool Hungry { get; set; }
- public int Age { get; set; }
In our Model, we're more able to explicitly define our properties than compared to JSON. Although JSON does a pretty good job already, our Model kinda gives more definition.
View
Now we're moving onto the more "complex" logic, nothing too deep. We'll just be doing some looping functions and a LINQ query.
Read
Yes, I know. We're starting with the wrong operation first but this one is the easiest and we'll do two types of Read operations; return one person by their Id and return all people.
Right at the top of our "Index.cshtml" we need to define which model we're going to be using, add
@model List<JSON_CRUD.Models.PersonModel>. This doesn't need to be an exact 1:1
representation of our PersonModel, in our case it will be a collection of PersonModel. The model that we're
defining here is what our Model send to our View.
We'll add our code that will display all people first:
- <h1>View All</h1>
- @foreach (var item in Model)
- {
- <p>
- ID: @item.Id<br />
- Name: @item.Name<br />
- Surname: @item.Surname<br />
- Age: @item.Age<br />
- Hungry: @item.Hungry<br />
- </p>
- <p>
- Shoes:<br />
- @foreach (var shoe in item.Shoes)
- {
- @shoe
- <br />
- }
- </p>
- }
And then display only one person by their ID:
- <h1>Select by ID</h1>
- @{
- JSON_CRUD.Models.PersonModel personModel = new JSON_CRUD.Models.PersonModel();
- personModel = Model.FirstOrDefault(x => x.Id == 234);
- <p>
- ID: @personModel.Id<br />
- Name: @personModel.Name<br />
- Surname: @personModel.Surname<br />
- Age: @personModel.Age<br />
- Hungry: @personModel.Hungry<br />
- </p>
- <p>
- Shoes:<br />
- @foreach (var shoe in personModel.Shoes)
- {
- @shoe
- <br />
- }
- </p>
- }
When we displayed all our people we used a foreach loop but because we only need one person in the second
example, we could use another loop and some conditional reasoning. This would, however, involve more lines
of code. We will be using a sexier, one line, LINQ statement (Line 5).
Line 3: We create a personModel variable as well as instantiate it (I don't think instantiation
is needed but it's become a habit now so I think JSON_CRUD.Models.PersonModel personModel;
would still do the things.)
Line 5: Later on we'll be returning a collection of people to our View from our Controller so in
Model.FirstOrDefault, the Model part is that collection. The
FirstOrDefault part returns the first item that satisfies the condition we set or the default
value if nothing is found or nothing meets the condition ("null" in this case).
What's in the braces is the condition. The variable x is just the name I gave it and this is the
only place it's declared so don't panic, you can call it whatever you like and IntelliSense will accommodate
it. The x => portion is standard so we won't concentrate much on that but what we will
concentrate on is the part that follows, x.Id == 234. It's exactly what we'd use in an
if statement.
The LINQ statement does some looping in the background and looks for items that satisfy the condition we've
set and then it assigns it to our personModel.
Create/Update
We'll combine our create and our update functions because they have the same format, we'll just do some wizardry on the Controller side to discriminate between update and create.
Add the following code:
- <h1>Add or Update Person</h1>
- @using (Html.BeginForm("Index", "Person", FormMethod.Post))
- {
- JSON_CRUD.Models.PersonModel person = new JSON_CRUD.Models.PersonModel();
- <label asp-for="@person.Id">ID</label> <br />
- <input type="text" asp-for="@person.Id" name="Id" /> <br />
- <br />
- <label asp-for="@person.Name">Name</label> <br />
- <input type="text" asp-for="@person.Name" name="Name" /> <br />
- <br />
- <label asp-for="@person.Surname">Surname</label> <br />
- <input type="text" asp-for="@person.Surname" name="Surname" /> <br />
- <br />
- <label asp-for="@person.Age">Age</label> <br />
- <input type="text" asp-for="@person.Age" name="Age" /> <br />
- <br />
- <label asp-for="@person.Hungry">Hungry</label> <br />
- <input type="text" asp-for="@person.Hungry" name="Hungry" /> <br />
- <br />
- <label>Shoes</label><br />
- for (int i = 0; i < 3; i++)
- {
- <label asp-for="@person.Shoes[i]">Shoe @(i + 1)</label><br />
- <input type="text" asp-for="@person.Shoes[i]" name="Shoes[@i]" /><br />
- }
- <button type="submit">Add/Update</button>
- }
Before I said something 'bout having our shoe collection size not being fixed in our JSON but here in line 21 - 25 we're only creating 3 spots for shoes. You can use any number you want, of course, but we're not using a more dynamic style of form control creation for the sake of simplicity for this example. If you'd like to know how to do this though, you can read an article in which I covered this concept.
Also, note that the name attribute in our input form controls are very important and the
spelling is just as important. This attribute is an indication of what needs to be returned to our Controller
from our View on submit.
Delete
Deleting will be simplar and we'll only be deleteing based on a peron's ID:
- <h1>Delete Person</h1>
- @using (Html.BeginForm("Delete", "Person", FormMethod.Post))
- {
- JSON_CRUD.Models.PersonModel person = new JSON_CRUD.Models.PersonModel();
- <label asp-for="@person.Id">ID</label>
- <br />
- <input type="text" asp-for="@person.Id" name="Id" />
- <br />
- <button type="submit" name="submit">Delete</button>
- }
That concludes the View logic.
Things I didn't explain above was the second lines of the Create/Update and Delete:
@using (Html.BeginForm("Index", "Person", FormMethod.Post)) and
@using (Html.BeginForm("Delete", "Person", FormMethod.Post)). These lines create our forms and
allow us to specify our routing for them. The first will call our Index action in our
Person Controller and the second calls our Delete action in our Person
Controller as well. This allows for multiple forms to exist in the same View.
Controller
In the Controller is where we'll be reading from our JSON and sending it to our View. We'll also be executing our CRUD opperations here.
JSONReadWrite
We'll create a class that will house the functionality of our reading and writing to and from our JSON.
Add the following Class and it's inner workings below the public class PersonController Class:
- public class JSONReadWrite
- {
- public JSONReadWrite() { }
-
- public string Read(string fileName, string location)
- {
- string root = "wwwroot";
- var path = Path.Combine(
- Directory.GetCurrentDirectory(),
- root,
- location,
- fileName);
-
- string jsonResult;
-
- using (StreamReader streamReader = new StreamReader(path))
- {
- jsonResult = streamReader.ReadToEnd();
- }
- return jsonResult;
- }
-
- public void Write(string fileName, string location, string jSONString)
- {
- string root = "wwwroot";
- var path = Path.Combine(
- Directory.GetCurrentDirectory(),
- root,
- location,
- fileName);
-
- using (var streamWriter = File.CreateText(path))
- {
- streamWriter.Write(jSONString);
- }
- }
- }
Before I had written this article I was using working code from one of my other projects as a reference and
found there to be code that wasn't needed. I've tested locally and it seems to be working fine. Look at me
learning with you guys :). I was using things that looked really, really important like
IHostingEnvironment and ApplicationEnvironment that I had found online and I
thought "Wow, this can't be wrong."
Read
In our default public IActionResult Index() method that was created for us, add these lines of
code:
- List<PersonModel> people = new List<PersonModel>();
- JSONReadWrite readWrite = new JSONReadWrite();
-
people = JsonConvert.DeserializeObject<List<PersonModel>>(readWrite.Read("people.json",
"data"));
- return View(people);
This returns the collection we defined at the top of our View earlier on.
Create/Update
Next, we'll be creating our logic for creating and updating and look a little more into that wizardry I was talking about earlier to discriminate between the two operations.
Create this method under the public IActionResult Index():
- [HttpPost]
- public IActionResult Index(PersonModel personModel)
- {
- List<PersonModel> people = new List<PersonModel>();
- JSONReadWrite readWrite = new JSONReadWrite();
-
people = JsonConvert.DeserializeObject<List<PersonModel>>(readWrite.Read("people.json",
"data"));
- PersonModel person = people.FirstOrDefault(x => x.Id == personModel.Id);
- if (person == null)
- {
- people.Add(personModel);
- }
- else
- {
- int index = people.FindIndex(x => x.Id == personModel.Id);
- people[index] = personModel;
- }
- string jSONString = JsonConvert.SerializeObject(people);
- readWrite.Write("people.json", "data", jSONString);
- return View(people);
- }
Although this method is also called "Index", we will use this post method as our update and create. This method will receive a PersonModel Model through the parameter in Line 2 that our View has populated based on what the user input in and posted the form.
Line 8 should be familiar as we've used this line of code in our View earlier on. Here we're looking for a
person by the ID posted back to the Controller from our View.
Line 10 is where we check if a person was found or not.
Line 12 is where we add the person to the people collection if a user hasn't been found. If a user hasn't
been found we will assume the user wants to create a user anew.
Line 16 is where we look for the index of the user we found if found.
Line 17 is where we "update" our person. It's not really an update because we're completely overwriting
the old data with new data.
Lines 19 - 20 are where we do the serialization to a JSON string and then the updating of our JSON file
respectively.
Delete
And finally, the Delete. Add the following method under the previously created method:
- [HttpPost]
- public IActionResult Delete(int id)
- {
- List<PersonModel> people = new List<PersonModel>();
- JSONReadWrite readWrite = new JSONReadWrite();
-
people = JsonConvert.DeserializeObject<List<PersonModel>>(readWrite.Read("people.json",
"data"));
- int index = people.FindIndex(x => x.Id == id);
- people.RemoveAt(index);
- string jSONString = JsonConvert.SerializeObject(people);
- readWrite.Write("people.json", "data", jSONString);
- return RedirectToAction("index", "Person");
- }
Line 8 is where we find the index of our person we want to delete.
And line 9 is where we remove the person from our collection.
Lines 11 - 12 are where we do the serialization to a JSON string and then the updating of our JSON file
respectively.
Although the above code does what it needs to do, a lot still needs to be done. All we covered was a basic idea of how it would be done. For instance, if we had to delete a person that didn't exist, we'd get this error:
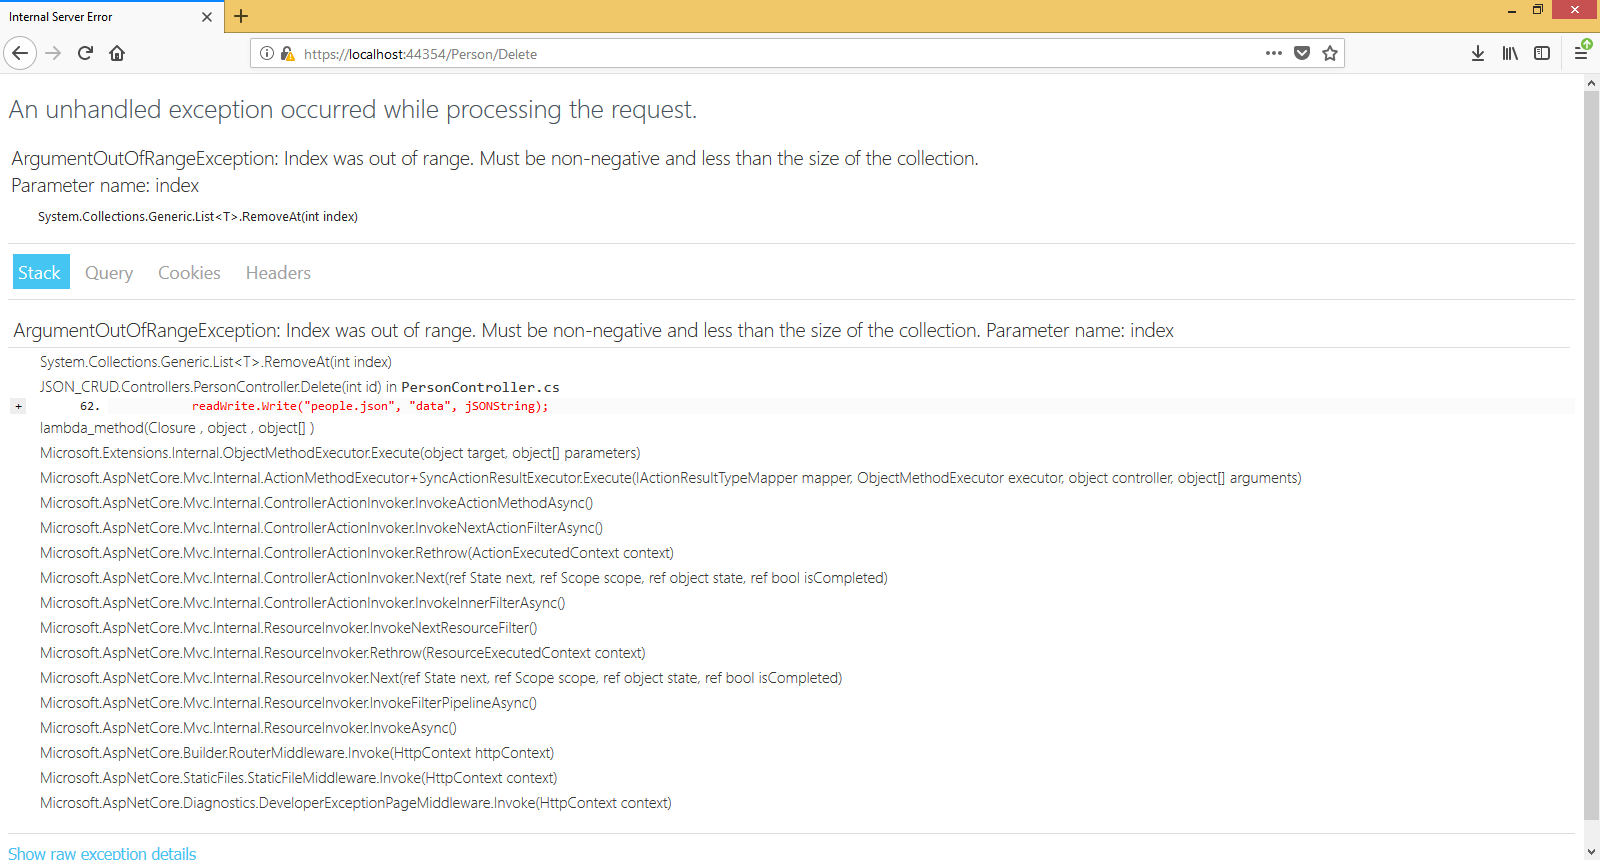
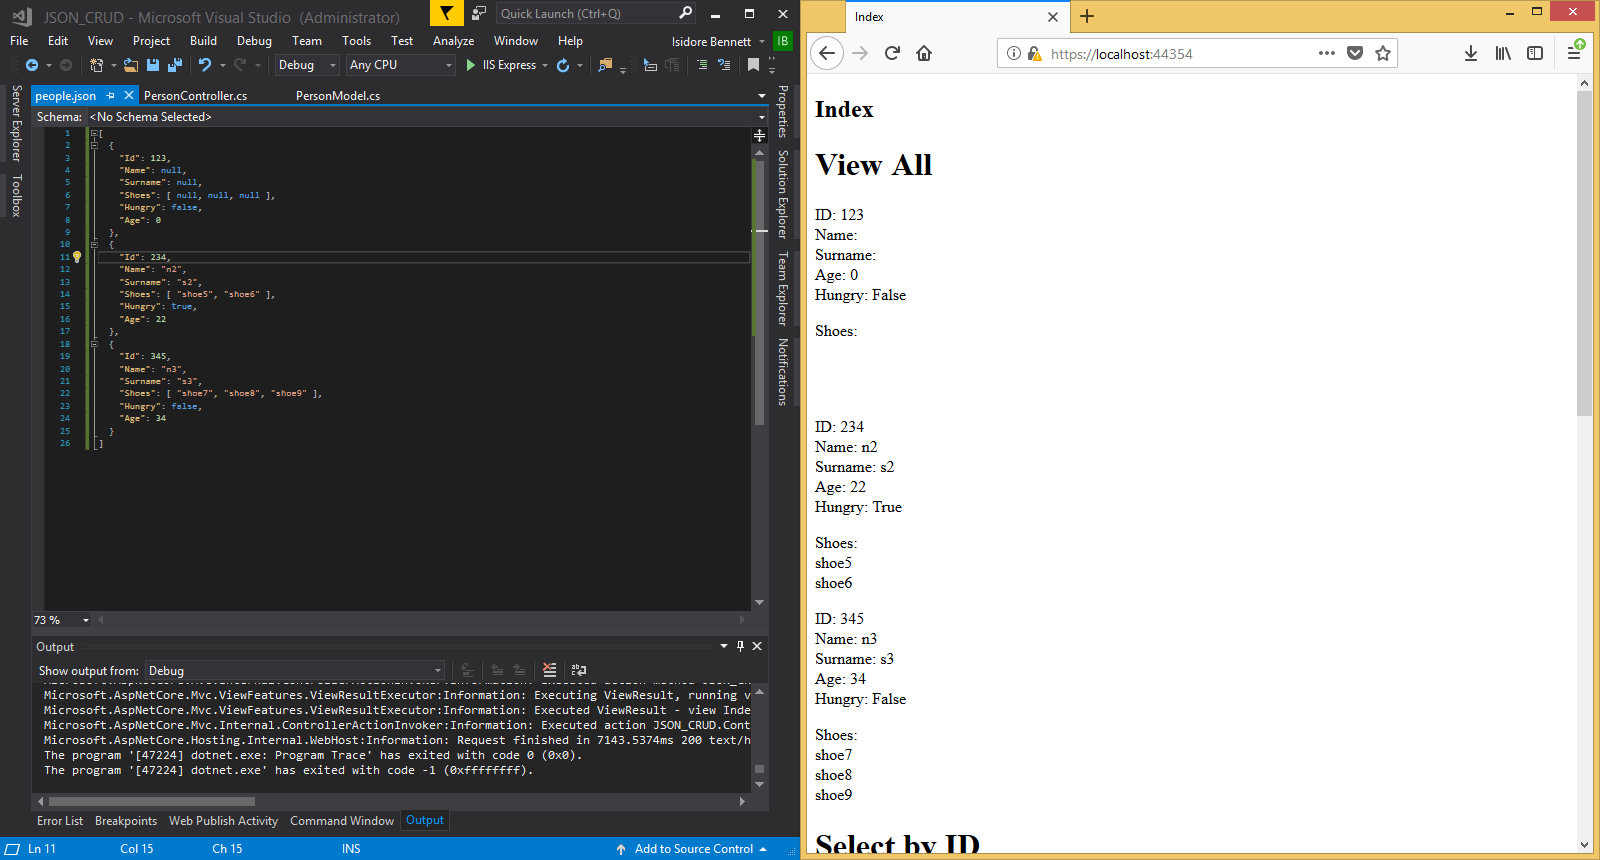
And because of the way we assumed that our user is updating a person if an ID matches what we already have in our JSON, if the user leaves all the fields blanks then all the data for that specific person will be overwritten with empties or nulls:
I hope this article was insightful and that you learned as much as I did. Please feel free to comment and ask any questions.